Recondition.IT – Thurlby LA-160A Logic Analyzer – Part 1

Towards the end of last year, I came across an interesting circuit board on eBay. It was the CY7C68013A-56 EZ-USB development board – made by Lcsoft. Perhaps made is too strong a word, let’s say “designed” by Lcsoft, and copied by the myriad of asian suppliers. Anyway, it was less than AU$8 including shipping, so I ordered one. In due course, it came, but by then – as usual – I was tied up with other things.

Over the last couple of days, I was sorting things out, and I pulled out my Thurlby LA-160A Logic Analyzer from my cupboard. This logic analyzer was bought at great expense back in either 1985 or 1986. This one was badged by RS Components and was 16-bit capable, with various clock and trigger inputs – very versatile and economical at the time, compared with others that there were available and completely unaffordable, at least to a small business.

I was doing repairs on computers at the time, mainly Commodore 64’s and the IBM PC/XT clones. From memory, it didn’t get used a lot, and still has the plastic that covered the display. Being on a small budget, I elected to make the data pods for it instead of buying them. Ok – to stop digressing, I powered the LA-160A up and could see the display go through a check of all the segments, then LA160A .32 was displayed, telling me that it says that it is a LA-160A and the rom version is 32. Shortly afterwards, it said ready – but then a short while later, started checking the display again, then coming back to LA160A…

It looks like something is slightly amiss with it, so I had a quick check of Google, as we usually do, and found an article about the Nicad battery, and how it could leak. Definitely after 30 years or so, a Nicad battery will most likely have self-destructed, so it was time to open it up and take a look.
SONY DSC

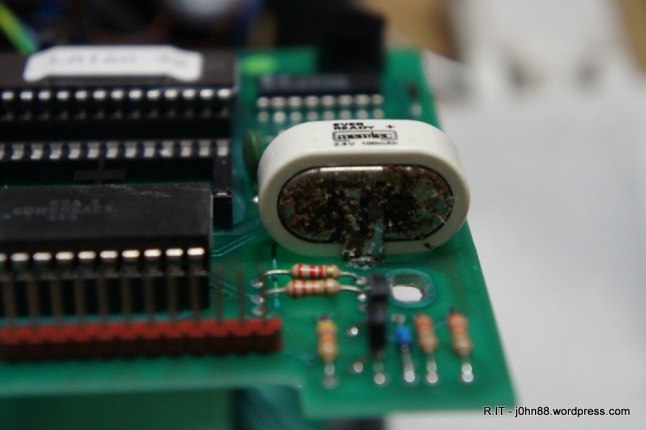
Nicad failure

For sure, the battery looked a bit worse for wear – the negative terminal was corroded. Not only that, it looks like the electrolyte leaking out of the battery has travelled quite a distance.
SONY DSC

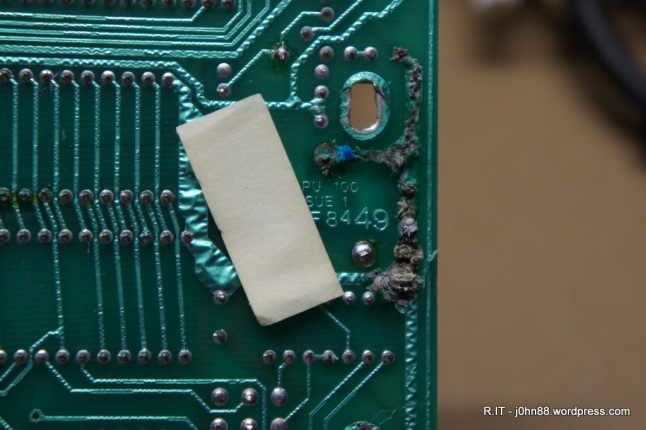
Under the board

Here the tracks under the battery appear also to be corroded, as in eaten away under the PCB coating. I had to remove the battery, which was easier said than done – the positive terminals were easy to desolder, but the negative terminal wouldn’t. I did manage to get it out finally and then it was time to inspect the damage.
SONY DSC

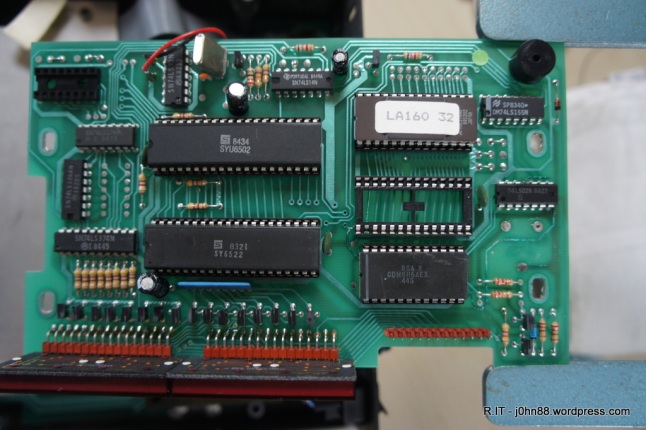
LA-160A controller board

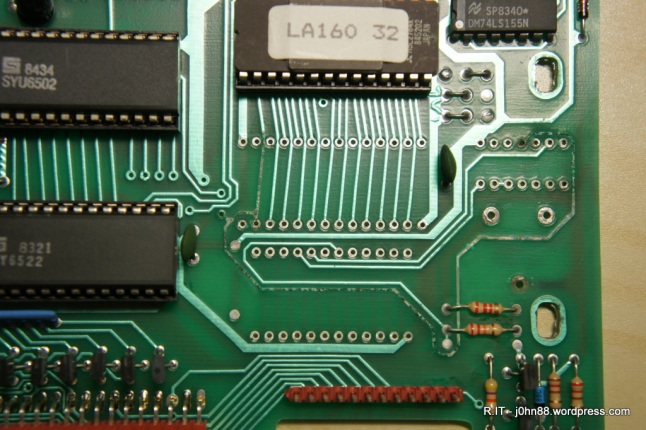
The top of the board shows where the electrolyte has followed the path of corrosion, a process called wicking where the liquid moves into small gaps, caused by corrosion. I could see that the corrosion has reached pin 11 of the 74LS02N chip on the right, then the track in the other direction has gone under the two resistors, under the 6116 static ram, then all the way to the empty 28-pin socket (for an option rom) where pin two is corroded.

The corrosion will not stop and must be cleaned. I cleaned the bottom of the board first, since there was not much to be done, except that the tracks were larger.
SONY DSC

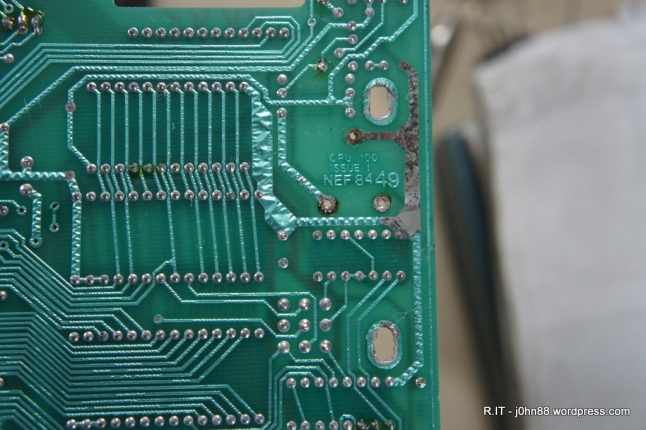
Corroded ground tracks cleaned (sort of)

I removed the 6116 chip, then desoldered the 74LS20 and both the 6116 socket and the option rom socket. After doing this, I continued the cleaning process – by using methylated spirits with cotton tips to clean the tracks that were corroded – to try to neutralize the electrolyte. Once it was dry, I used a small flat screwdriver, and a fibreglass pen to remove the majority of the corrosion, then cleaned again with metho. Once I was happy with it, I gave the board a clean using isopropyl alcohol cleaning wipes (as the metho leaves a white deposit).
SONY DSC

controller board after cleaning

Now it looks better. I could see that the corrosion had been moving in the direction of the LA160 32 eprom, so it looks like I caught it in time to prevent any major damage.

The next steps to do will be as follows:

  1. Repaint the cleaned tracks with a PCB Resist Touch Up paint, preferably in green. This will protect the tracks.
  2. Refit the 24-pin ic socket for the static ram and install the 6116 chip again.
  3. Fit a 14-pin ic socket for the 74LS02N.
  4. Check if I have stock of the 74LS02N, if not – then order a couple – I like to keep spares.
  5. Check continuity for all connections relating to the damaged tracks. Jumper wires to be soldered in place as needed to fix damaged connections.
  6. Order a replacement battery 2.4V 100mAh. Nicad ones are not available, but a NiMH 2.4V 140mAh battery is available at one of my usual suppliers. If I do this, then I need to ensure that the logic analyzer is turned on every couple of months or so, to keep the battery charged up. It is usually a flat battery that starts leaking, plus of course – old age.

I have decided not to install a 28-pin option rom socket for the simple reason that I don’t have the LR-64 option rom for this logic analyzer. If I do get hold of one and want to install this, it would be a simple matter of installing the socket at that time. Also leaving the socket out would allow me to inspect the corroded tracks to confirm that the corrosion is no longer progressing.

By the way, the LA-160A will capture 16-bit data at 10MHz sampling rate. The little CY7C68013A board will be able to capture 8-bit data at 25MHz – an example of new technology at less than a hundredth of the cost of the LA-160A. For about $100 I could get a logic analyzer that can capture 34 bits at 125MHz – maybe that is for another day.

Anyway, this is part 1, with more to follow.

P.S. During my Google search, I found a site http://sonicsheep.com/Electronics/3-LA160%20Writeup.htm that talked about the battery and had a newer rom version 50 available for download, and from another site

http://k1.spdns.de/Vintage/Sinclair/Other%20Inventions/Other%20Electronics%20Products/

found a service manual for this LA-160A. To try out the version 50, I will need a 2764A eprom or perhaps a 2864A eeprom. The 2764A is uv-erasable, but I don’t have a uv eraser, so the 2864A being electrically-erasable would probably be better. Anyway, it depends on what is available and from where.

[Edit]  After checking my stock of integrated circuits and finally finding a 74LS20N, I found that I had misread the IC and actually needed a 74LS02N, of which I do have plenty. Updated the above article with 74LS02N. I should wear my glasses.

Resurrect.IT – HP dc7700 Small Form Factor PC

Back in my lab – sounds great, doesn’t it – ok, it isn’t actually a laboratory, but it is my
working area where I work on computers.  I have worked in a real laboratory though – the Sydney County Council Measurements Laboratory, at the School of Electrical Engineering, UNSW.  We worked in the area of precise electrical measurements, was NATA registered and cooperated on many projects with CSIRO.  Ever actually measured a nanovolt?  I even designed and built a frequency divider with missing pulse detection for a rubidium frequency standard.  Another thing we did was to measure the capacitance of a semiconductor junction in a transistor – never before measured, only theoretical capacitance – and the measurement agreed quite well. This lab is long gone as is the Sydney County Council, but I digress.

Ok – the job at hand, to access stored browser passwords on the machine. One utility I have can access IE 7 & 8 protected storage passwords, but need to know the logon password, as this is used to encrypt the passwords.  The other utility can look for other browser passwords, but needs to run on that machine as that user.  Choices galore! In this case though, the Edwin user did not have a password, and I did not locate any internet explorer stored passwords. So now I need to “resurrect.it“.  Replacing the motherboard is possible, but after doing this, it might also be the power supply – or a combination. I could get a second hand machine on the internet – probably cost $100 plus, is it worth it?

I decided first to have a look at the power supply. After removing it from the machine, I opened it up and had a visual look – I found an electrolytic capacitor that was bulging, a sure sign of over-heating, but checking its ESR (Equivalent Series Resistance) – it wasn’t high. I didn’t have a direct replacement on hand, but I replaced it with one that was close enough but this did not fix the problem. I also removed the cmos battery – a CR2032, while I did more cleaning up. I removed the cpu cooler, took it apart to get rid of the accumulated dust, then checked the cpu, an Intel Core 2 Duo E6300. I cleaned the thermal compound off the cpu and heatsink, then applied Arctic Silver 5 and reinstalled the cpu and heatsink. After putting everything back in, applying power did not give the beeps and this time, the power stayed on. The machine still however failed to boot from the hard disk – but it was certainly working better than before. My diagnostic card that was plugged into the PCI slot did not indicate anything other than that the voltages were nominal.  This often means that the motherboard has failed – but it could be the bios has been corrupted. In any case, continuing on further is not economical – but I could do this later just as a learning process.

I could “resurrect.it” by virtualizing the machine.  Is this like virtual reality, you might be thinking – yes, very similar.  That is what I started doing yesterday. I have currently two VMware servers running, a new ESXi 5.5 server that I am configuring, and an old ESXi 4.0 server that runs my other virtual machines.  The first thing to try is whether or not the disk image that I collected previously would boot directly on VMware – it is unlikely, but is worth a try since it doesn’t take long, but I do need to bring the disk image into VMware first.

Step 1. Create a new virtual machine on esxhost2 (my new ESXi 5.5). The machine is called tdc7700 (for testing). The machine though is empty and I need to populate it.

Step 2. Boot the tdc7700 vm with a Ubuntu cd – once that is running, copy the disk image from the network onto the disk. I use dd again but before doing this I had to mount the network share using the mount -t cifs command.  Ok – done.

Step 3. Modify tdc7700 settings to make the disk independent, and not allow changes to be written.  This is to avoid having to copy the image again if something goes wrong.

Step 4. Power on tdc7700 – I saw the Windows XP screen come up briefly before a blue screen. Ok – thought it might happen.  This is probably because the original machine had a sata disk controller, and now tdc7700 has a scsi disk controller.  It cannot locate the original disk, hence the blue screen.

From here on, I will need to do a P2V conversion – a physical to virtual conversion, where in my case the physical is actually this tdc7700. There are a number of ways to do this, but the best way is to run the VMware offline converter which unfortunately is obsolete, but still usuable.  The converter is smart enough to make changes to windows hardware configurations in order to create a disk image that would run in a virtual environment.

Continuing, then…

Step 5. Boot the tdc7700 vm with a coldclone303 cd. Press the appropriate buttons to get to a target virtual machine called vdc7700 – it wouldn’t work to access esxhost2, strange. Everything is fine until it verifies the destination environment, then stops with an error. My esxhost2 is a newer VMware host and the datastore version is VMFS 5 – maybe this is causing a problem? So tried again, but now going to esxhost1 (my ESXi 4.0) server whose datastore is VMFS 3.  Success – I start the importing of the machine and it took about two hours to run.  Not bad with processing 80GB of disk across the network.

In the meantime, I was able to find a newer version of coldclone being 4.1.1, so when this finished, I tried again with coldclone411 but it still wouldn’t accept a destination of esxhost2, so decided to continue anyway, and create another virtual machine called vtdc7700 as it was time for bed. This time, I elected to minimize the size of the disks for the import process. once it had commenced, I went to bed.

This morning, I checked that the import had finished. Yes, it had – and now, will it work?

Step 6. Power on the new vdc7700. Yes, it boots up – at low resolution anyway. It tries to
update some drivers for changing hardware, that’s ok. I rebooted, then logged in and installed the VMware Tools – this ran, but then the machine hung – not so good, but not too bad.  Reset it and tried again, then successful. Changed the resolution to 1024×768 – much better. It has been resurrected!

Step 7. Run my utility to check for IE passwords – none, what? Check other browser passwords – none either.

I can access the machine in my virtual environment, but a lot of the programs are in Chinese, and I don’t read Chinese. It looks like 360Safe is installed. They are not using Internet Explorer so might be using the 360Safe browser to access email. Anyway, I asked them to come and see me and maybe they can show me how they access their email.

So in the meantime, a bright idea occurred to me – I could convert it so that they could run it on one of their other computers by using VMware Player. Since it is running now on my VMware host, it should be able to run on their computer. I will test this out and come back with a later update.

[PS]  Virtualization is quite good for running old machines where some application is still needed that cannot be moved to newer hardware.  Windows NT was always very picky when it comes to hardware and doesn’t cope well with newer hardware – so is very often moved to a virtual environment like VMware to keep it running. Windows XP on the other hand is much better at this and another alternative could be to put the hard disk into another computer and it will just update hardware drivers, maybe even have to activate again due to too many hardware changes at once – maybe I should do this and get rid of that old computer that is sitting around…