
In the past months, I have been receiving some comments about the calibration of the Eagnas Plus 8000 Electronic Tension Head, and I realize that I may not have given any details about this procedure since it is documented in the user manual. It appears that many users do not have the user manual, so when I mention the calibration, the users are still in the dark.
To help out, I have found my photocopy of the instructions and referred to section 7 which details the steps for calibration and will describe them here. The content is straight from the instructions with slight grammar changes and I have added a couple of notes in blue.
7 – Calibration
- Calibrate the Eagnas electronic tension head when the Eagnas Plus 8000 stringing machine does not perform properly. NOTE: It is recommended to wear safety glasses during the calibration.
- Unplug the power cord from the wall outlet.
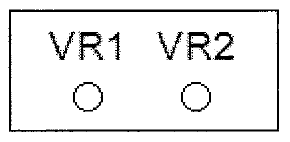
- If your model has the VR1 and VR2 on the back panel, please skip steps 4 through 11. [My note: The earlier models had the two potentiometers mounted on a circuit board inside the machine. If you are lucky enough to have a newer version, then they are mounted on a small board that is accessible via the back panel.]
- Use a screwdriver to loosen two screws that hold the side cover to the string gripper.
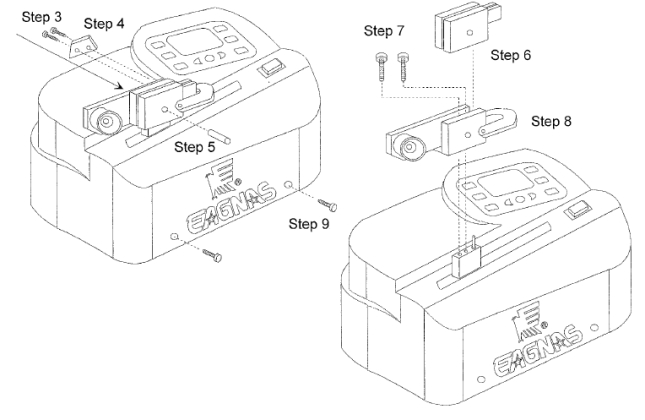
- Remove the side cover from the string gripper.
- Place a small stick against the dowel pin and use a hammer to apply a light force to the dowel pin as shown. Push the dowel pin out of the string gripper housing.
- Carefully lift up the string gripper from the string gripper housing.
- Use the 5mm Allen wrench to loosen two screws that hold the string gripper housing to the electronic tension head.
- Carefully lift up the string gripper housing from the electronic tension head. [My note: most of them have a pair of wires that attach to the switch using a small connector. This usually has glue on it, and it needs to be disconnected before the cover can come off. During final re-assembly, if you have a hot melt glue gun, use some glue to ensure that the connectors don’t come loose.]
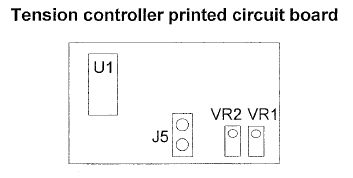
- Use a screwdriver to loosen four screws that hold the cover to the electronic tension head. Carefully lift up the cover from the electronic tension head and put it on the side of the electronic tension head. Make sure the cables are still connected to the tension controller printed circuit board.
- Re-assemble the string gripper housing back to the electronic tension head. [My note: don’t forget to plug the connector back in for this step, otherwise the electronic tension head may give an error on the display.]
- Plug the power cord into a properly grounded wall outlet. Turn the power on.
- Set the tension setting to 60-pound position.
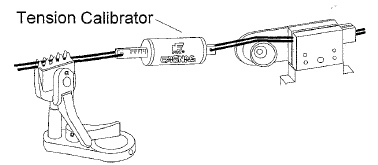
- Use the Eagnas string clamp to secure the string on one end of the Eagnas TCG-100 tension calibrator and place the string that is attached to the other end of the Eagnas TCG-100 tension calibrator into the string gripper.
- Press the pushbutton tension switch to activate the tension pulling. Check whether the tension indicated by the Eagnas TCG-100 tension calibrator is the same as the tension setting of the electronic tension head.
- Press the pushbutton tension switch again to release the tension pulling.
- Repeat steps 15 through 16 four or five times to have the correct tension indication on the Eagnas TCG-100 tension calibrator to avoid poor calibration due to string stretch.
- If the tension indicated by the calibrator does not match the tension setting of the electronic tension head, adjust the potentiometers “VR1” and “VR2” on the back panel slightly. Or adjust the potentiometers “VR1” and “VR2” on the tension controller printed circuit board slightly. NOTE: There will be a range of tension from the maximum tension at which the electronic tension head stops pulling, to the minimum tension at which the electronic tension head starts pulling again. The difference between the minimum and maximum could vary 2 – 4 pounds depending on the string and the tension calibrator used to calibrate the electronic tension head. Therefore, it is recommended that the tension setting of the electronic tension head should be calibrated on the maximum reading to ensure the consistency in the calibration procedure.
- Turn off the power. Press the “+10” key and hold down. Then turn the power on. The display should read in between 34 – 39. If it does not, then turn the potentiometer VR1 to increase or reduce the number into the correct range.
- Use a small screwdriver to adjust the potentiometer “VR1” slightly. To achieve a higher number, turn this potentiometer “VR1” clockwise. To reduce the number, turn it counterclockwise. NOTE: Do not apply excessive force; this will damage the potentiometer.
- After making the adjustment, press the “+” key and the machine will run the normal program.
- Set the tension setting to the 60-pound position.
- Press the pushbutton tension switch to activate the tension pulling. Check whether the tension indicated by the Eagnas TCG-100 tension calibrator is the same as the tension setting of the electronic tension head. If not, press the pushbutton tension switch again to release the tension pulling.
- Use a small screwdriver to adjust the potentiometer “VR2” slightly. To achieve a higher tension, turn this potentiometer “VR2” clockwise. To reduce the number, turn it counterclockwise. NOTE: Do not apply excessive force; this will damage the potentiometer.
- Repeat steps 23 through 24 until the tension calibrator reaches the 60-pound position.
- Repeat steps 19 through 25 four or five times to reach the right tension.
- After calibration, turn off the power. Unplug the power cord from the wall outlet.
- If your model has the VR1 and VR2 on the back panel, please skip step 29.
- Disassemble the string gripper from the electronic tension head. Carefully install the cover back to the electronic tension head. Use a screwdriver to tighten four screws to hold the cover to the electronic tension head. Re-assemble the string gripper back to the Eagnas Plus 8000 electronic tension head.
Ok, so there you have it, or is that it?
As you can see, it is an iterative process to do the calibration. VR1 and VR2 obviously affect each other. The aim is to have VR2 set so that the tension will be pulled correctly while VR1 keeps the zero balance to read between 34 and 39 – does this make sense?
Another comment I would make is that you should calibrate it so that it is correct for the maximum tension that you would ever use. I.e. if you only ever string at 50-55 lbs, then calibrate it at 55 lbs. If you are stringing badminton racquets, then I would suggest calibrating at 26 to 30 lbs, whatever the maximum your clients ask for.
The tensioning is non-linear, so ideally, you would create a calibration chart. What do I mean by this? Make a chart of set tensions and read what the calibrator shows the actual tension to be. 45 lbs on the tension head gives ?? lbs on the calibrator, do this every 3 or 5 lbs up to the maximum that you string at. Then you can extrapolate so that if you actually want 50 lbs, you can set the correct number on the tension head to get the 50 lbs.
Next question is that the Eagnas TCG-100 tension calibrator is a spring calibrator which itself might need also need calibrating so what should we use? Ever see those electronic or digital luggage scales? Those are quite handy and they are available to read in both lbs and kgs.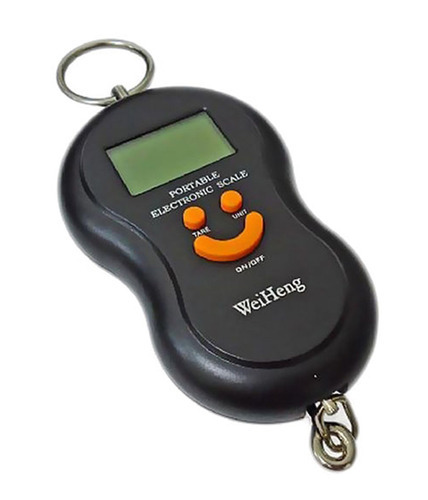
I bought a couple of different ones, so that I could use them to compare each other – if they both read the same, then generally that is the right tension. I use it check the calibration on my Wise 2086 tension head – and I found that these luggage scales are quite good. I prefer the ones like the one above which has a ring which is handy to attach string to.
So there you go, the calibration procedure, if you don’t have your instructions.
