Reinstall.IT – Windows Vista Business on HP EliteBook 2530p

After I had managed to upgrade the Bios on this HP EliteBook 2530p laptop, I had installed an evaluation version of Windows 10 on it, and eventually put on Windows 7 – which was not activated – of course, since I didn’t have a valid license at the time.

Anyway, I did try to find out if I could obtain the recovery disks for this EliteBook, but it seems to be difficult. I could contact HP and fork over a bit of money to have a set of disks sent to me, but it didn’t seem worth it at the time. That is – until I had some software I wanted to use, that just wouldn’t work on Windows 10, 8 or 7. This EliteBook had a Windows Vista Business product sticker on it – so I decided to try to reinstall Windows Vista Business onto it.

Browsing the internet, I managed to find a Vista Business iso file, but you had to register for it – and then I came across this webpage.

https://www.raymond.cc/blog/how-to-burn-downloaded-windows-vista-to-dvd/

I thought I would give this a go, since it meant downloading some 3GB+ of files, which eventually was successful after a couple of tries. I chose to download the 64-bit version, and used the Zotac WinUSB Maker to put the installation onto a USB disk. Ok, it wasn’t without problems.

Firstly, I downloaded the first two required files, which was successful. Then the third file, which was by far the largest – got 95% of the way through then stopped and couldn’t resume. I tried again, but this time, I used a Free Download Manager to do the download, since it can also handle large files and seems more robust during the downloading process. This was successful – great. Then I went to run the X14-63453.exe program as being the next step – but this didn’t complete – came up with an error.

ScreenShot070

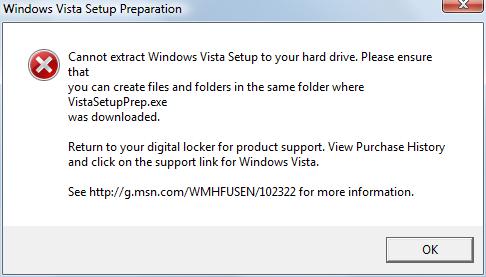
What could this be due to – maybe, because it was running on my 32-bit Windows Vista machine. I copied it over to the network, then downloaded it to my 64-bit Windows 10 machine, and ran it, and it was able to extract all the files – fantastic. Then copy the extracted files to the network, and back to my Vista machine.

Next step was to either burn a DVD or place it on a USB disk. I wanted to use the ImgBurn to make a DVD, and because I was installing so many things on my machine, I decided to try the Portable version of ImgBurn. After downloading it, my Norton 360 antivirus decided that the downloaded file was not trustworthy. Ok – I have a few SanDisk Cruzer Facet 8GB USB Flash Drives, that I bought from OfficeWorks when they were on special at $2.97 each – so downloaded the Zotac WinUSB Maker program. No complaints from Norton 360 this time.

Insert USB disk, ok – done. Drag and drop the drive letter to Zotac – done. Drag and drop the Vista folder to Zotac, done. Click the button to Make USB Bootable – starts to do something, then crashes – a critical error when injecting boot tag.

Back to Google, and find that other people had the same problem, and some bright person found out that you just reformat the USB to FAT32 first, then it will work. So I formatted the USB from NTFS to FAT32, then went through the same process and – voila, it finished without errors.

Alright! Now I plug in the USB disk into the EliteBook, then power up, and choose to boot from USB disk, great news – I get the Windows setup coming through – then after choosing a few options, then asks for the product code or Windows key, which is on the bottom of the laptop.  However, I had taken a photo of it with my camera beforehand, so didn’t have to juggle the laptop to type it in. I chose to not activate automatically when online.

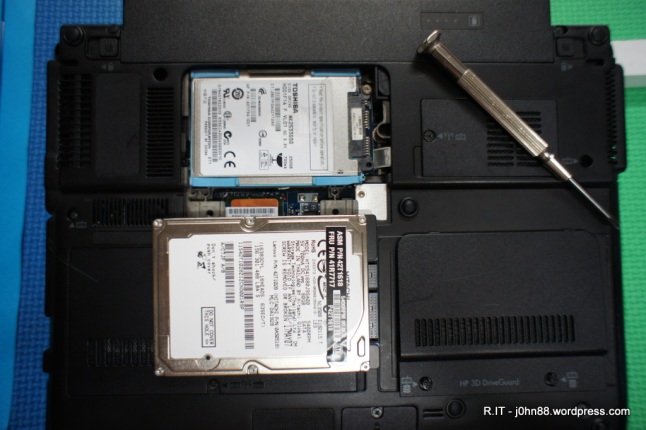
After some time, the installation completed and I was faced with a low resolution Windows Vista screen. When doing an installation like this, it is often the problem that hardware is not recognized therefore drivers are not installed automatically. This was a problem because even the onboard ethernet controller didn’t have drivers. It wasn’t an insurmountable problem as I could downloaded enough SoftPaqs from HP’s support website to get networking going, then download the myriad other bits and pieces before Device Manager stops showing and problem devices.

While this was happening, Windows Update was also running and downloading updates. By the way, this version of Windows Vista was Service Pack 1. I downloaded the Service Pack 2, which was half a gigabyte, but before I installed it, I decided to Activate Windows. I went to the computer properties, then clicked the Activate Windows Now link, and it came up and told me that it couldn’t activate automatically and to use activation via a number of methods. I chose Phone activation, then chose Australia, and I was given a phone number to call and an Installation ID – which was nine groups of 6 digit numbers.

I went to my speakerphone and dialed the number, chose 1 for Windows activations, then proceeded to enter the groups when prompted. After this I got my pen handy, and copied down eight groups of 6 digit numbers – which was entered into the activation screen – and a successful activation. I then started the Service Pack 2 installation – which is ongoing as I am typing this.

So this is a way of reinstalling Windows Vista if you don’t have a recovery disk. It is better to try to get a recovery disk, because there is some software applications installed that you cannot get the downloads for, like Roxio Creator Business and sometimes WinDVD etc.


Review.IT – When apples ain’t apples!

Further to my reprogramming of the BIOS for my HP EliteBook 2530p, I did some further research since I generally research things before I order bits from eBay.

The Atmel AT26DF321-SU chip used for the BIOS in the HP EliteBook 2530p is in fact a SOIC-8 package – however, it is based on the EIAJ standard which was 5.2mm across the body when I measured it with my digital caliper. The other standard is JEDEC which measures 3.9mm across the body when I measured some other SOIC-8 chips. In actual fact SOIC and SOP are often taken to be the same package.

Now, here is when it gets a bit confusing. SOIC packaging refers to pin spacing of 1.27mm however SOP is supposed to be for less than 1.27mm pin spacing – understand? If you were to design printed circuit boards, you will often need to actually obtain the components in order to do so, or have to go through tons of datasheets to verify package sizes – correct? Actually, not so – most people would use software that would pick up these details when you choose the part number of the item you are placing on the circuit board, so a SOIC-8 package should be the right one, or is it?

My research has shown that the standard JEDEC SOIC-8 package would be about 3.9mm across the body. The EIAJ SOIC-8 package would be about 5.4mm across the body. For higher pin counts, like SOIC-16, there is actually a package that is 7.5mm across the body. The good thing is that the pin spacing is the same – at 1.27mm for SOIC.

I found also that there is a mini-SOIC or sometimes called a micro-SOIC that has pin spacing of 0.5mm, so be careful of what you are actually seeing – don’t just pick up on the SOIC and assume 1.27mm pin spacing.

Interestingly enough, the datasheet for the Atmel AT26DF321-SU also refers to the chip as being a plastic small outline package, or PSOP.

Anyway, the chip adapter socket that I bought is actually for SOIC-8 and SOP-8 when referring to the JEDEC package and for 1.27mm pin spacing. I just couldn’t use it for my chip because I needed a EIAJ socket – oh well, at least I can use it for other SOIC-8 chips. This means that I didn’t actually buy the wrong adapter socket, just didn’t read the Atmel datasheet fine print sufficiently.

Reprogram.IT – HP EliteBook 2530p Bios Eeprom

A while ago, a HP EliteBook 2530p came into my possession. The internal hard disk drive had been erased and the Bios Setup screen was password locked. I was able to determine that the Bios version was F.10 which was very old. F.22 was the latest version available on HP’s website – which I duly downloaded at the time.

The Bios password is quite complicated in these laptops – nothing like the usual desktop. This password and associated settings are stored within an internal Eeprom – which is an Electrically Erasable Programmable Read Only Memory – quite a mouthful. After a bit of examination of the laptop – I noticed what appeared to be an IC socket near the wifi cables when the memory cover was removed. I was able to work out how to open the socket after a bit of fiddling – it pays to be careful as the slightest wrong move can break the latch.

Fortunately, it was a case of push down on the cover, then slide towards the front of the laptop and with a small click – the socket cover unlatches. Underneath was an Atmel AT26DF321-SU. This is a 32-megabit 2.7V serial firmware dataflash memory chip, in an 8-pin SOIC package. Essentially, it is a SPI Serial Eeprom and can operate at up to 3.6V – ok, now to find a programmer.

After a bit of research, I determined that it would be possible to use a Raspberry Pi to access the chip – but I then found on eBay, a CH341A 24, 25 series programmer that was able to program this AT26DF321 eeprom. I decided there and then to order one, since it was only $5.69. I also ordered a replacement AT26DF321-SU at $5.18, then a 8-SOIC test clip socket adapter ($6.59) plus a 8-SOIC to DIP-8 socket adapter for $1.61. Then it was just a matter of waiting for these items to arrive.

Within the next month, these parts all came in – but as I was doing some other things, these parts got placed on the to-do shelf. A couple of days ago, I thought it was time to look at the laptop – and it wouldn’t turn on, flat battery. Anyway, after charging I confirmed that it was able to boot up – from a test version of Windows 7 that I put onto it. It’s a test version because it keeps complaining that it wants to be activated.

I was able to find on the internet, where someone had placed a dump of the eeprom for just this 2530p laptop and it was for a F.12 Bios version – great. I pulled out an old XP laptop and connected the CH341A to it, installed the driver and ran the program. I was able to choose 25 series, then Atmel, and finally to choose the AT26DF321. Next was to connect the chip – that is when I found that the 8-SOIC to DIP-8 socket adapter wasn’t what it was, but actually a SOP-8 to DIP-8 adapter. My chip is too big to fit in the socket, so I proceeded to use the test clip which fortunately worked. The test clip is usually for accessing eeproms that I still on the motherboard, but it works just as well with loose chips.

Ok, new chip connected – click the Detect button, and it interrogates the chip – it found something, so that I did a read of the chip – which only took a short time. Good, no smoke and basically I see a screen full of FF characters denoting a blank chip. That is when I noticed a button called Blank – which checks if the chip is blank, fantastic. Next step, removed the old eeprom and read the contents and save it to a file. I will probably need that when I update the data. Anyway, new chip back into the test clip, then open the F.12 dump file and program the new chip. This time, it took longer then said that chip and data is the same – fantastic. Pop the chip back into the laptop and switch on.

Not good – a red warning that the machine is not in a committed state, then below that “Invalid serial number”. I read on the internet, that I would need a program called CPQTAG.EXE to update these fields, but while I was searching for it – I had a look at the dump of the original eeprom. I could see various sections containing a serial number, model number, sku number etc, so thought I would transfer some of this data across – however it wasn’t in the same place, of course, due to a different Bios version. Since I had a F.22 Bios version, I decided to update the Bios first, then make the changes.

Late last night, I was able to download a version of CPQTAG.EXE – I had a look at the program with a hex editor – to check that it was actually the right program, this time it was. I downloaded another one earlier but when I examined it, it didn’t look right – seemed to contain certificate information similar to what Windows has, so thought that it was likely to be a rogue program, designed to replace your certificates, install a trojan or two – so this was deleted quick smart. You really must be careful when downloading programs from the internet where the source can be untrusted.

This morning, I had a go at using CPQTAG while booted from a USB stick – it runs from Dos and I had a bootable Windows 98 USB stick available. I was able to do a few things, then managed to lock the bios by running a command out of step. No matter, just erase the old chip and reprogram it with my current version of F.22 which of course I saved a copy of, after I upgraded the Bios.

To keep a long story short – here are the steps that I had to do. I had already updated the eeprom with the model number, SKU number and put back the original UUID, so all I needed to do was to update the serial number so that it stops complaining, then commit the machine state.

cpqtag write serial XXXXXXXXXX      where the X’s are the required serial number

cpqtag write me on    to enable the Management Engine

cpqtag reboot me    then the machine reboots and I boot back to the usb stick

cpqtag write vpro on

cpqtag reboot vpro   then the machine reboots again, and I boot back to the usb

By now the warning message is gone, and so is the invalid serial number message.

A quick check of cpqtag read vpro shows that the Vpro Configuration now shows VPro Enabled, Descriptor locked, Management Engine enabled, and Flash Protection Override disabled. This is good as this was the previous setting when I ran cpqtag on the original eeprom.

Why did I need to go through this exercise?  It’s because I wanted to verify the Bios settings so that I can do things like enable Virtualization Technology and UEFI Boot mode. I also disabled the Ambient Light sensor, which was causing the screen to be very dim, when it first boots up. Here is a photo of all the bits that I had bought from eBay.

SONY DSC

CH341A programmer with test clip, socket adapter, eeprom and pencil

Next on the agenda for this laptop – since the internal 1.8″ disk drive is not readily obtainable, to install Ubuntu Linux onto it as I already have a few Windows laptops.

SONY DSC

SONY DSC

P.S. The photo above is to show the disk drive, a Toshiba MK2533GSG with a 2.5″ Sata disk drive sitting nearby for a size comparison. These tiny disk drives are no longer manufactured, so in the future, I would have to go the SSD way – get something like the Addonics ADMS18SA 1.8″ mSata adapter together with a mSata SSD drive.