Repair.IT – Overheating Presario SR5120AN motherboard

Remember two and a half years ago, approximately, I repaired my Compaq Presario SR5120AN motherboard which had a number of failed capacitors?  Ok, it was some time ago, so here is the link.

Reveal.IT – Faulty capacitors on Presario SR5120AN motherboard

At the time, five capacitors had failed, but there were still four others of the same brand and size on the motherboard. I checked them with an ESR meter and they all passed. Fast forward to a month ago – I noticed that my computer cpu fan was getting louder, sometimes normal then suddenly high speed and this kept happening. I ran a utility to check the CPU temperature and it was …  99 degrees, wow! No wonder the fan was on turbos a lot of the time.

I shut down and took the computer apart to reveal the motherboard.

DSC_0308

Two of those same original capacitors were showing the symptoms of failure – see the bulging top and black spots. After some effort, I was able to remove these two capacitors, then replace them with the ones in that little bag – I originally bought ten of these 1800uF 6.3V electrolytic high temperature capacitors. I checked the remaining two on the board and they check out fine.

So, reassemble the computer, and power on – leave it on for a while, and I can see that the CPU temperature is sitting reasonably stable at about 80 degrees. This is still quite hot and would appear to be still abnormal. Since I still have three spares left over, why not just replace the remaining two capacitors and be done with it.

That is what I did – took out the other two capacitors, replaced them with new ones. While I was doing this, I checked the capacitors with my ESR meter, which showed that these two were still ok, but anyway I have new ones in the motherboard now. Once the computer was up and running again, leave it for a while and then it was looking good so I decided to run the Passmark Performance Test, which stresses out the computer.

OpenHardwareMonitor

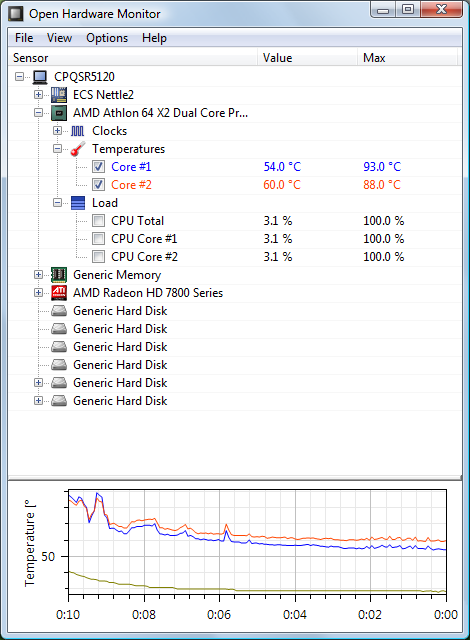
This is what the CPU and graphics card temperatures were during the test and then the cooldown period afterwards. The CPU maximum went to about 93 degrees but then back down and sitting stable at 54-60 degrees. This is amazing and shows that even though the ESR meter indicated that the capacitors were ok, replacing them reduced the average temperature dramatically. Why is that – maybe the capacitance has changed? Wait, I can check this!

Just over a year ago, I had bought from eBay, a Mega328 Transistor and component tester. I can connect the parts I have removed and compare with new parts.

These two are the failed capacitors. They appear to be back to back diodes with differing forward voltages.

DSC_0319

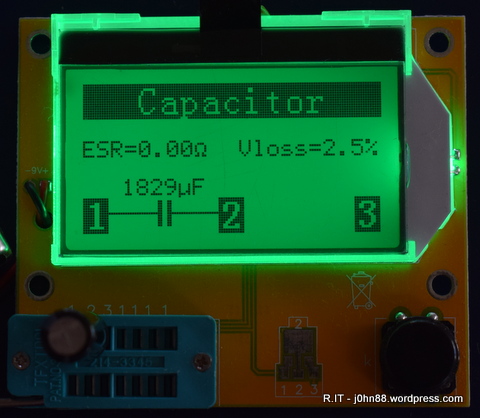
Here is a new one – my final remaining capacitor. The value is 1829uF, ESR is good, with Vloss of 2.5%.

Here are the two apparently good ones that I replaced. These also appear to be good as far as the tester is concerned, however replacing these two also brought down my average temperature of the CPU. Why? I don’t really have an answer for this, but maybe someone has.

Right now as I am writing this, my CPU temperature is sitting at around 80 degrees, with CPU load at about 85% since my antivirus scan has been running for some time, but certainly nowhere near the 99 degrees at idle that it was a month ago. It has been a few weeks now, and all seems to be well.

Replace.IT – LCD Screen for Compaq Presario V6002AU

I had this Compaq Presario V6002AU 15.4″ laptop sitting around for a little while – as they do. This laptop had a bad lcd screen, in that the display is dim and doesn’t look like anything is recognizable. I had taken it apart to check the screen. I have a copy of the Maintenance and Service Guide for this laptop. This guide shows how to open and replace parts of the laptop and is a must-have if you are to do this properly without damaging any of the plastics or component boards. Most of the time, these guides are quite accurate – and occasionally they might leave out an instruction or two, like in this case, remove the front panel switch cover requires removing three screws instead of two screws.

Ok, that isn’t the topic of today’s post – but the lcd screen is. The Compaq spare part number for the lcd screen is 431386-001, which is with BrightView, i.e. glossy. I duly went on Google to check whether this panel was available, and found a local supplier on eBay that had this for $81.99 including free postage. Ok, so I ordered it, and when it arrived, I noticed that the backlight cable was a little short. I compared panel part numbers – my original panel is a LG Philips LP154W01 (TL)(AE). The replacement panel is a LP154WX4 so I contacted the seller and we conversed via eBay and email. Anyway after explaining that the backlight cable was too short by about 2cm, I asked whether or not they had a LP154W01 (TL)(AE) in stock.

They came back to me by asking me to cut the backlight cable, and take the old backlight cable and join it to the replacement panel, and that way it should reach. I replied that this is not recommended especially since the backlight voltages are very high, usually from 500 to 900Volts. The wires have silicone insulation and if I do cut it and repair, it can form a leakage point, whereby some of the time, the display becomes dim, due to the backlight not lighting properly. Not to mention voiding the panel warranty if it should fail and then they say that the panel has been tampered with. Anyway, the solution to this eBay panel is that they asked me to send it back and they will refund me.

Now, I could find the required panel, but at a higher price, about $115 – but then it isn’t really worth it. I decided to scrounge around my old broken laptops and eventually came across a Compaq Presario V4000 with the same size screen. Ok, maybe I can use this so proceeded to remove the screen from the laptop. This screen is a LTN154X3-L01 – however the backlight cable is long enough, and the lvds connector is in the right place. I obtained the datasheet for this screen, and confirmed the pin configuration of the lvds connector is the same and the original screen. The resolution is the same, so how about I try it out? I connected this screen temporarily and powered on the laptop and was greeted with a Compaq power up screen, ok – great, so switched off and proceeded to install the screen properly.

After everything was put back in place, I had zero screws left over – always a good feeling. I power up and it wouldn’t power on – now what. Then I realize that maybe the battery is flat. It just happens that one reason I wanted to resurrect this laptop is that it uses the same battery as a HP Pavilion laptop that we had had for many years, which I have a spare battery for. I grabbed the spare battery and put it in and powered on – success, the laptop booted into Windows XP Professional. This laptop only has 1GB of ram and can handle up to 2GB maximum. I think I will use this as my Windows 10 test machine, or perhaps just run Linux on it.

The moral of the story is that quite often lcd screens from different laptops can be compatible as long as the lvds connector is the same and it is located in the right place. This one had a 30 pin lvds connector, but it is always good to compare pin configuration just in case one screen doesn’t use the standard wiring – don’t want to damage a good screen or damage a laptop motherboard.

P.S. No pictures, since a working laptop is … a working laptop.

Reveal.IT – Faulty capacitors on Presario SR5120AN motherboard

Last night, when I was swapping out the Corsair HX650W power supply from my Compaq Presario SR5120AN desktop computer to use in my VMware server, I noticed a bad or failed capacitor.  So, you might ask – what are the obvious signs of a failed or failing capacitor that it is possible to see with the eye? Here is a photo of the motherboard that I removed from the desktop this morning.

SONY DSC

The electrolytic capacitors that quite often fail are those with aluminium cans – these are the common types that fail due to over-heating.  What happens is that the dielectric material inside the capacitor is an electrolyte that will dry out either with time or through over-heating causing vents to open.  The venting of capacitors can occasionally be an explosive event with a loud bang – if anyone is around to here it.  Sometimes if you are lucky – you might hear a fizzle.  Can anyone with sharp eyes see anything unusual on the motherboard?

Sounds of suspense here – tick tock tick tock…  Ok, see that there is one capacitor on the top left – which has a bulged and blackened top, then another four in a row beneath the cpu?  Usual signs are bulging of the top – a sign of over-pressure caused by over-heating. If the vent opens, then electrolyte is released – this is that black stuff.  The bulging with or without dark/black discolouration is how a bad or failed capacitor will “reveal.it“self. On the top of the other capacitors, you can see something like a cross or a T shaped logo – this logo is actually the vent, where the aluminium is deliberately weakened so that failure occurs along the crease marks.  These capacitors are 1800uF 6.3V rated up to 105 degrees Celsius.  There are another four of these that would appear to be intact on this motherboard.  I don’t have any of these in my parts stock so will need to order.

Usually we would replace all of the ones that fail and including those of the same brand and type that have not failed, so I will need nine of them to be ordered.  I don’t have to replace the other four as they haven’t yet appeared to fail, but generally speaking, it is just a matter of time – so best to get the hard work done now instead of doing it again later. Why hard work? Motherboards are multi-layered board that can be very difficult to work on even with specialized desoldering equipment.  Sometimes no matter what, a capacitor may stubbornly resist being desoldered – and usually when this happens, we have to get the cutters out and cut it off the board, then use a soldering iron on one side of the board and desoldering iron/tool on the other side.  I have had to do this once or twice.

You may also notice that I had removed the cpu heatsink.  The thermal material has gotten quite old and is brittle and flaking off – I have cleaned it off and put in Arctic Silver 5. Then reinstalled the motherboard since it is still working, with the occasional freeze and blue screen – I am typing this right now on that desktop.  Anyway, that’s it for now.

[Note]  Desoldering equipment should be maintained regularly.  Due to the higher temperatures involved, the desoldering tip can go black from oxidation and then it will not transfer heat well, which requires increasing the temperature, which makes it worse, etc, etc.  I use a Chemtools Tip Tinner – it is something that has powdered flux and solder that reactivates the desoldering tip – also used for soldering irons.

[Note2]  When the electrolyte dries out, the capacitor’s capacitance will be reduced – which means that its function in the circuit, for reducing ripple, will be degraded.  Also the drying electrolyte will have a higher ESR (Equivalent Series Resistance).  This higher ESR also causes the capacitor to dissipate more power which leads to more heating – this is the mechanism that means that once it starts, it will continue until failure.  I have an ESR meter and with this I could test the other four capacitors to see if they are still functioning well – and then decide to replace or not, but the five failed ones definitely require replacement.