Replace.IT – Upper fan for Antec 1100 computer case

I am a little down with the flu, so sitting at home, it is always a good idea to do some writing, or is it blogging – to clear the backlog of R.IT articles.  The Antec 1100 is a great computer case, since it has lots of fans, and space for hard disks, and lots of expansion slots.  That’s a lot of lots – right.  It had started its life as a case from my scrypt (think – cryptocurrency) mining computer, and was eventually repurposed for my VMware ESXi server.

My ESXi server needed six hard disk drives so this case was ideal for it. After a couple of years of operation, I started hearing a bit of rattling sounds from the server which would come and go.  Eventually I noticed after removing the side panel, and by looking up, that the top exhaust fan, was sometimes stopping and if it would spin, would spin with a wobble or slight rattle.  This was the cause of the sound.

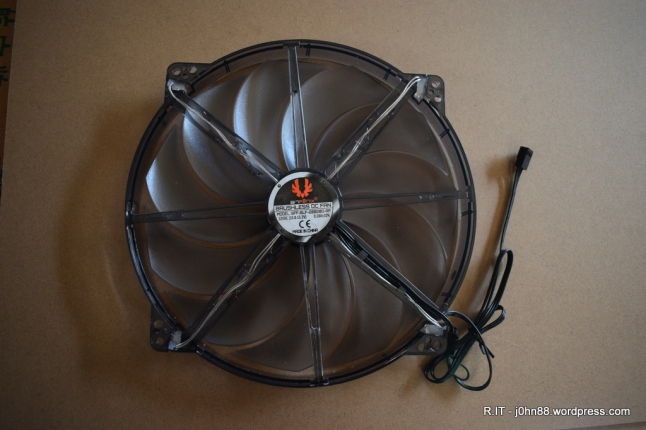
The fan was a 22cm fan, but it was a slightly longer shape – and checking on some forums found that others had similar problems, but had replaced the fan with a standard 22cm computer case fan. I found a Bitfenix 22cm case fan from a local supplier who had it in stock, so bought that one.

DSC_0357

Here is the original fan from the Antec 1100 case. The mounting holes are not as standard as I thought.  When I compared it with the Bitfenix fan, I found that the Bitfenix followed the standard mounting radius and that the Antec fan, had a slightly smaller radius.  After some consideration, I noticed that there were other spots where mounting holes could be available, so used a 4.5mm drill to enlarge the holes adjacent to the standard mounting holes.  It is a bit hard to describe, so here are a few photos.

DSC_0342

This shows the new holes nearby, and the next one is a closeup to clearly show the new mounting hole that is away from the corner.

DSC_0343

So, after this, it should be a small matter to reinstall the fan, however since the server was still running, I decided it would be best to shut it down to make the job easier.  I don’t want to accidentally drop a metal screw onto the motherboard and cause a failure to occur.  Another Replace.IT done.  Now what should I write about next, maybe something of an electronic nature – except those haven’t come up very much lately.


Repair.IT – Air Compressor

Some months ago, I needed to paint the wooden deck in my backyard – yes, the one that I built – did I write about it? Anyway, the oil that I used was starting to wear off. A colleague from work suggested that I use a spray gun to make the job go faster which I thought at the time was a great idea. I had already been asking around for a new oil to buy, but the final word was that since we had already used the Cutek oil, that we should continue with that oil.

My colleague had lent the air compressor to another colleague, who in due course finished with his work, and I was able to get the compressor, a long coil of air hose, and a spray gun attachment. On the next available weekend, I hauled everything to the backyard, connected the power to the compressor, and switched on. At this point all I heard was a slight clicking sound coming from the compressor, so switched off. Switched on again, and still the clicking sound, which doesn’t quite sound like a motor turning, but more like a stalled motor.

I shut the power off, then could see the rotor through the grill and could turn the rotor with a long screwdriver, so that means that the motor hadn’t siezed up.  After a bit of head scratching, I decided to open up the cover to expose the motor. An air compressor is essentially a motor that turns a compressor that pushes air into a container until it bursts – or actually, until a pressure is reached whereby the motor is switched off before bursting point.

The motor is just an average ac motor, usually one that is either a capacitor-start motor or a capacitor-run motor – which means that if it doesn’t work, usually it is because a capacitor has failed. So essentially, this capacitor failed between its last job and in transport to my home – what luck. So, opening the cover should allow me to see the capacitor, remove it for checking, and then obtain a replacement.

DSC_0337

As Murphy would have it, part of this was easy and also not easy. The capacitor had some hard black plastic foam glued to it, to stop it from rattling against the case, but the foam had hardened to be almost rock-like – it had dented the side of the capacitor, and as luck would have it, has also covered the part that shows what size the capacitor should be. I measured the capacitance and it was very small, almost unmeasurable whereas I would expect something in the 10-30 uF.

I then used a hacksaw to cut the black foam, and eventually exposed the label enough to show that it is a 35uF capacitor, which was also not an easy one to find. After some time, I decided that I could get a 30uF and a 4.5uF and connect them in parallel, to get 34.5uF which should be close enough, since most capacitances are +-5%.

DSC_0345

Here is my replacement capacitors wired together.

DSC_0346

And now, here they are mounted on the motor frame, which fortuitously had mounting points for two capacitors – great.  Once wired in, and cover replaced – switch on, and the sound of… a loud compressor running, ok – so pressure is not increasing and air coming out the bottom – the drain bolt needs to be screwed out to close the drain.  Try again – and finally, pressure increasing – and eventually, yes – it stops.  Great – another Repair.IT done and can get back to spraying some decking oil.