My journey of repairing and recycling anything I put my hands on that I believe is still useful. Not just hardware, but including software with relevant content and issues in the field of Cyber Security, Vulnerability Scanning and Penetration Testing.
I also mentioned that the rack module didn’t have drive bay guide slots, so I had to bend the metal guides out of the way so that it could be fitted into the Coolermaster case. I didn’t mention that this module used trays that have four screws to fasten the disk drive in the tray. As time went on, and swapping out disks meant removing the screws and replacing the disk and inserting the screws that eventually I only used two screws. Another thing was that the fan at the back of this module was a bit loud.
A couple of weeks ago, I was reviewing my current network storage. I run a Qnap 4-bay NAS and also an older Seagate 4-bay NAS. Pricing of newer NAS storage boxes meant that I would have to spend more than $800 for anything larger than a 4-bay that had a x86 or x64 processor. I decided that I should build a Truenas Scale storage server that could then have at least five bays and had the capability of adding more drives as I needed.
I reviewed my various hardware parts that I had on hand, and decided on a MSI Z270 Krait Gaming motherboard that had a Pentium G4560 process and 16GB of ram. This motherboard combination had been used in one of my multi-GPU crypto-mining rigs and it was time to put it into use again. The reason for choosing this particular motherboard was that it could support 6 sata disks.
The motherboard also supports 2 M.2 slots that could use NVMe or Sata SSD’s.
From the manual, I looked up the M.2 & Sata combination table. The table suggests that if I put in a Sata SSD into M2_1, then Sata5 is unusable, and if I use a Sata SSD in M2_2 that Sata1 would be unusable. At the same time, using NVMe disks in both M2_1 & M2_2 would also disable Sata5 & Sata6. But my question is, if I put in a NVMe disk into only M2_1, does that mean I can still keep all Sata ports?
Analysis of the table, now seems to show that if I put a NVMe disk into M2_2, then both Sata5 & Sata6 is unusable. So I might be right that having a NVMe disk in M2_1 might be what I need to do. The reason is that Truenas Scale needs to be installed onto a disk of some sort, so might just be fine on the NVMe.
I decided to use the same case and power supply from the data recovery machine, so all I need to do is to remove the existing motherboard and install the MSI Z270 Krait Gaming in its place. This was done in due course, then with only one NVMe installed, no other Sata disks, I proceeded to install Truenas Scale.
I used Rufus to write the Truenas iso to a USB flash drive, but this wouldn’t boot for some reason. Then I tried again, but this time got Rufus to write the iso in dd format. This worked fine, and I now had a working Truenas, albeit without any storage.
The next thing to do was to install some disks. I had received two 8TB disks from Amazon, and I had three 4TB disks left over from upgrading my Qnap NAS after a couple of disk failures. The disks were configured as a mirror of the two 8TB’s and then a RaidZ1 with the 4TB’s.
This configuration used all five drive bays. To confirm my hypothesis that Sata6 is still usable, will be left for another day. All I needed to do was to move the server into the corner of the room where the noise is not as noticeable.
Ok, it wasn’t the only thing to do, I did decide to check the power usage over a period of time, and it varies from 61W to 65W. If I use 65W as the average power usage, then it will consume 1.56kWh per day. My electricity cost right now from Origin Electricity is 30.778c/kWh, so this Truenas storage server will cost me 48 cents a day to run, with a yearly cost of $175.37 in electricity. If I bought another Qnap NAS, costing over $800, it would use less power and hence, less electricity, so running costs might be reduced. Anyway, I think re-using current hardware would be cheaper in the long term.
Now what about my data recovery machine, which is missing a case and hot sway bays. There is another article on the way for that topic.
Most of the time, we use Kali Linux in a virtual machine environment as we are running vulnerability scans and trying out exploits on other virtual machines. Recently I was doing some work with analysing some older physical machines running a combination of Windows 7 and Windows Vista. I decided that it would be very handy to have a Kali Linux laptop that I could then connect into the test network instead of having to use a virtual machine.
I browsed a number of supplier websites looking for a suitable laptop. My requirements are actually quite simple. A minimum of 4GB ram – but expandable to 8GB, and the storage should be 500GB SSD, and most important of all, a physical ethernet port. At the same time, I didn’t want to spend a lot of money on this, so any reasonably cheap laptop would most likely be suitable.
Little did I realize that with the current (last few years) trend of making lighter, slimmer laptops that the manufacturers decided to remove the physical ethernet port as it is was big. I was able to find laptops that had an ethernet port, but those were business laptops, with pricing at $1500 and above. I could use my Dell Inspiron 15 which is now almost 3 years old and it has an ethernet port – but this is my daily workhorse when I have to go to the office.
So I decided to see what laptops I already have that might be suitable. Thus, I started a process of cataloging the older laptops that had an ethernet port. After a long process, I ended up with a Dell Latitude E6410 that I had obtained from somewhere. It had an Intel Core i5 Mobile 560 processor, 5GB of ram, a 160GB hard disk, and a dead battery. Most important was that it had an ethernet port.
The Intel Core i5 Mobile 560 processor has a Passmark benchmark rating of 1838. Compare this with my Dell Inspiron with a Core i7-8565U which has a Passmark of 6364, and my desktop with a Core i5-9600KF with a Passmark of 10835. In any case, the Dell Latitude E6410 should be able to do what I need and would give me a portable Kali Linux machine.
The Dell Latitude had a 2.5″ Sata disk in it. I checked online to find the cheapest 2.5″ SSD with capacity around 500GB and was able to get a Silicon Power A55 SSD with 512GB for only $65 from Umart. Then looking for replacement batteries, I was able to get a battery from BetterBatt for $39.66 – they have free shipping if you buy a minimum of two batteries, so also got a battery for a HP Elitebook 2530p at the same time and price. The battery should arrive sometime soon, so in the meantime, I will install Kali Linux.
I have installed Kali Linux numerous times on virtual machines, so thought that I shouldn’t have any issues with doing the same on bare metal, i.e. a physical machine. I downloaded the latest Kali Linux – version 2022.1 for amd64 – which is 64-bit. Then used Rufus to write the iso to a Sandisk USB. Plugged in the USB to the Dell Latitude and turn on the power pack.
I get a Bios message saying that the time and date are not set – ok, that probably means that the CMOS battery is also dead – I will have to replace that afterwards. Press F1 to continue, then press F12 to go to Boot options. Choose to boot from USB – then away it goes. Or does it?
I choose to install, then English language, then Australia as the locale, then US English keyboard and it runs then ends up with an error saying that it cannot find the installation media. I didn’t get a screenshot, but went to run a shell, and entered the command:
mount /dev/sdb1 /cdrom
Then exit the shell, and choose to repeat that last step – away it goes. Partition the disk, ok – done. Choose user name and password, ok – done. Continuing on, it starts installing the base system and then…
Ok, that’s not good – retried this step, but it just won’t go. I just can’t get past this step. I thought that maybe the version is too new, and found an older version I had already on USB. Tried to install that one, and the same thing happened. I tried a different installation like Ubuntu desktop, which seemed to install but I ended up with a nonbootable laptop.
After some time spent on all this, I realized what might be the problem – and a Google search also suggested the same thing. When I wrote the downloaded Kali Linux iso to the USB, Rufus suggests to write in iso format instead of dd format. Writing in iso format has been working for me, but then I realized that I had only used those with Live CD’s, i.e. everything runs from the USB – I had never tried installing with iso format – except when the iso was written to an actual DVD. That would explain why the iso works in virtual machines, since the iso is mounted as a CD/DVD device – but this iso is on a USB.
I figured that the installation program sees that it has booted from an iso, and looks for the /cdrom – that explains the first error that I had encountered. Anyway, to cut a long story short, I wrote the iso to the USB again, but this I told Rufus to write it in dd mode. By going to dd mode, it sees the USB as an external disk drive, and not a CD/DVD. Then the installation goes through properly because it never has to try to find the /cdrom device. So, make a mental note – iso mode is fine for running Live CD’s, but for installation, must use dd mode.
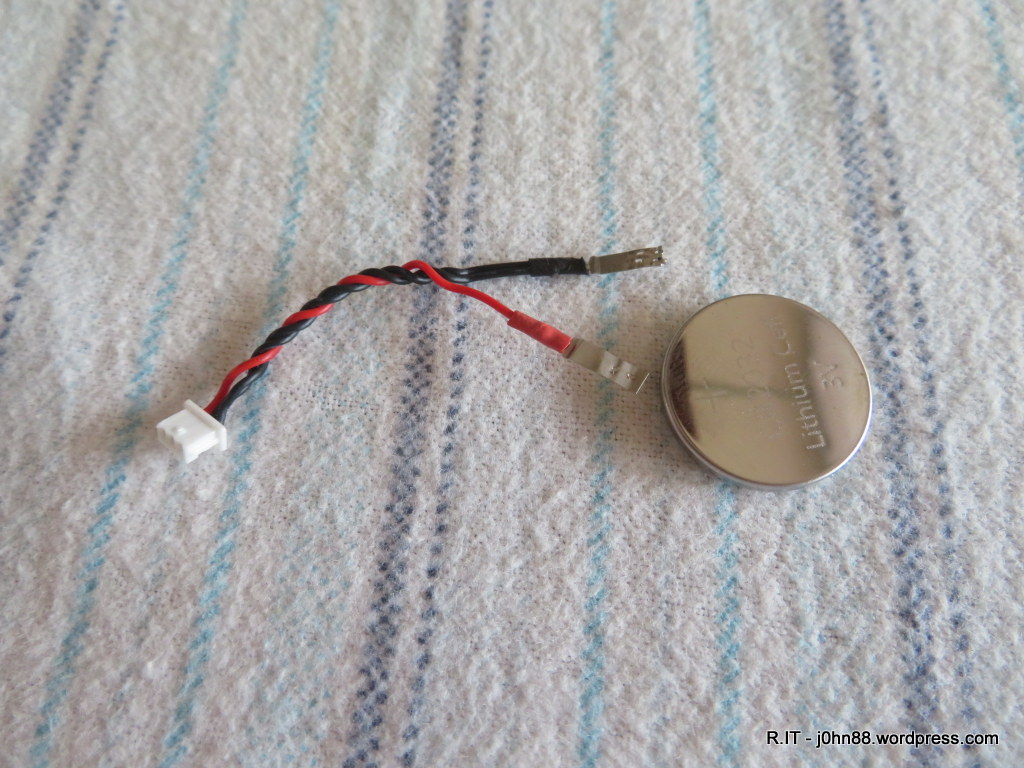
The next step was to search for a replacement cmos battery. I removed the laptop bottom cover, and saw that the battery had a three pin plug on it. A search on ebay found most of them were two pin and even when it was for this particular laptop. I found some from the UK, but this would cost $12 or more when shipping was included, so forget that.
I decided to jury rig a replacement one as I had plenty of the CR2032 batteries in my spare battery box. I removed the heatshrink cover of the failed battery, then carefully peeled the tabs off from the battery.
Then it was a matter of bending the tabs a bit so that when I wrapped it with insulation tape, the compression would help to keep the tabs in contact with the battery. You might ask, why didn’t I solder the tags onto the battery?
It is because lithium batteries don’t like a lot of heat. I did attempt it with a low temperature solder (such as that supplied with ChipQuik), but it just wouldn’t stick to the battery even after using some flux, so the next best option was to do what I did. Alternatively, I could have gone to my local Jaycar store and bought a PCB mounting CR2032 battery for $3.25 then just solder the wires onto the tags. Maybe I might have to do that if this jury rig battery stops working – but that is for the future.
In the meantime, the replacement main battery arrived and was installed and charging up. I had a look at the support website for this laptop and found that there was a more recent bios update from 2017 – the original was 2010, so I should update the bios while I am at this.
I downloaded the latest A17 bios – which was an exe file – it needs to be run from Windows or DOS. The old hard drive had a Windows on it, but would stop with a blue screen. I put that 160GB disk back inside and had a look at repairing it. Eventually I could see that it was just a standard Windows 10 installation with not much in it, so decided to perform a reset from the advanced options in the troubleshooting assistant that comes up when Windows doesn’t boot too many times.
The reset went on for maybe an hour as I had left it to do its thing. After the reset completed, I came back and tried to log in. The user account was dell and the password hint was “asset tag”. I tried asset tag, but no go – and there was no stickers on it to show what the asset tag was. Now I need to hack the Windows password. Boot from my Win10pese usb disk, then run the nt password changer – and changed the dell user account password to “asset tag”, lol.
Reboot and login – successfully now. Copy the A17 bios exe file to the Temp folder and run it. It says it needs A09 to be installed first. Ok, download A09 Bios, and run that – which completed after a couple of reboots, then run A17 and eventually – bios updated.
Put the SSD back in, and I have a Kali Linux laptop, with 8gb ram (yes, I added more ram), a working main battery, a replacement cmos battery – and all is done! Not bad for a couple of days work spread over a week or two.
I was watching some Youtube channels talking about wireless penetration testing and it turns out that some of the popular USB wifi adapters have trouble working in Kali Linux, but are working fine in Parrot OS. Maybe I need a Parrot OS laptop as well. I do have a HP Elitebook 2530p that I got the battery for, but it doesn’t have a replaceable disk drive, and now it seems to have a bad screen as the image is shifted on the display. I do have another SSD since I bought two at the same time, I could put Parrot OS onto that, and have both. Let’s leave that for another day and you readers, have a good day!