Revitalize.IT – Low storage on a Lenovo Legion 5 laptop

Have I mentioned that I get a lot of jobs from family? These are not really jobs – you could say that these are chores or requests for assistance. Anyway, my brother mentioned that his daughter wanted to increase the storage on her laptop as it was getting full. I asked what laptop it was, and was told that it was a Lenovo Legion 5 15ACH6.

I asked him to get her to run “wmic diskdrive get model” from a command prompt on her laptop. It came back with SAMSUNG MZVLB512HBJQ-000L2 which told me that it was a M.2 512GB NVMe drive. This means that I could expand it to maybe 1TB, so ordered a Lexar 1TB NVMe disk which was available a few days later.

That was a couple of weeks ago, and today – being Anzac Day, he came over with his family and the laptop. He said that he would pick it up on a weekend.

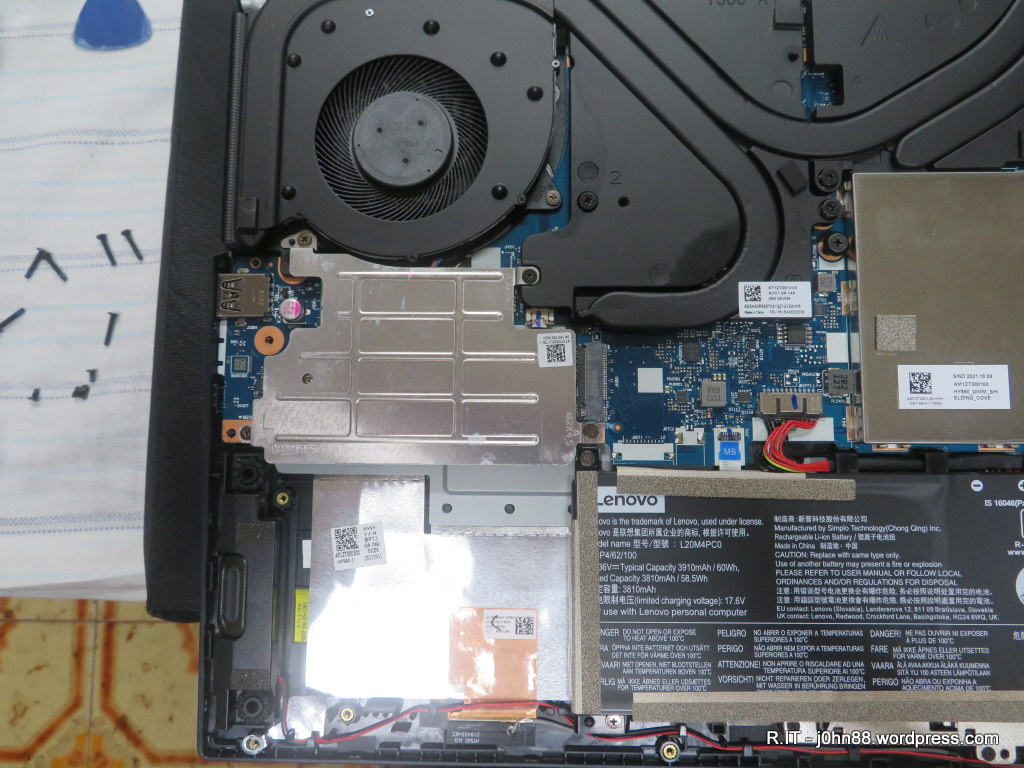
I removed 10 screws and was able to pry the bottom cover off. I could see where the original NVMe was located and to my surprise, found another NVMe socket on the other end of the motherboard.

I removed the metal shield and could see that the Lexar could fit in there – so that would be an easy job, just install it and then put the shield back on.

Well almost. I saw that one of the cpu fans was covered in dust, so had to vacuum and brush both of them to get rid of the dust. After that was done, I turned the laptop over and powered it on – leaving the bottom cover off, just in case it doesn’t work. I did put a spacer under it, so as not to block the fans.

Windows booted up, and I ran Disk Administrator, then was prompted to initialize the disk – and chose GPT, and then created a simple volume and did a quick format – all done. Ok – had to put the bottom cover on after shutting down, then put the screws in – 6 of which were long ones, wouldn’t want to mix those up, would we?

The addition of an extra 1TB of storage would Revitalize.IT – the laptop, I mean. I will let my niece sort out what data to move to the second disk, which should improve performance.

Wow, this is a record – for me to write about something that was only done today and not weeks, months or years ago.

Rebuild.IT – Data Recovery machine

In a previous article – Repurpose.IT – Norco SS-500 from data recovery machine to Truenas Scale storage server – I had swapped the motherboard in my data recovery machine so that the case with the Norco SS-500 could be repurposed to become a Truenas server. I also removed the Silverstone FS202B from that case, so will reuse it in my rebuilt Data Recovery machine.

The motherboard will stay the same – being the MSI B450-A PRO MAX together with its AMD Ryzen 5 3400G cpu and the 16GB of memory. I had another Coolermaster case on hand, so decided to use this together with a Corsair CS750M power supply. I didn’t need to use a 750W power supply, but I had this available. The Silverstone FS202B went into the case to be wired to the Sata1 & Sata2 ports.

This motherboard has a single M.2 slot that can handle NVMe or Sata SSD’s.

The important thing to note in this situation is that if I use an M.2 device, then I lose Sata5 & Sata6. I will have to remember this in future. The M.2 slot will handle both NVMe and Sata devices. I won’t need to use the M.2 slot for Sata devices, as I had bought a couple of M.2 to 2.5″ Sata adapters in 2021. This was the M.2 SSD NGFF (B Key) to 2.5″ SATA 7mm HDD Enclosure Case Converter Adapter and surprisingly, the price hasn’t changed from what I paid. I put my M.2 Sata SSD into one of these and just use one of the 2.5″ bays on the FS202B.

If I want to do copying of NVMe to NVMe, then I will have to use the onboard M.2 slot together with a Orico M.2 NVMe to PCIe 3.0 X16 Expansion Card that I bought for $16 late last year.

Two of the Sata ports are used, so now I need to get drive bays to fit four 3.5″ Sata disks. I could go for a SilverStone FS304-12G 4-Bay Triple 5.25″ Cage for 3.5″ SAS/SATA HDDs which is $179.95 from Mwave. The advantage of this cage is that it is trayless, so the disk drive just slides in and close the door – no more playing around with a screwdrive any time I want to swap a disk.

I decided to go for a SilverStone FS303-12G 3-Bay Double 5.25″ Cage for 3.5″ SAS/SATA HDDs which is $129.95 and has 3 bays in a double 5.25″ cage. Then to have the extra drive, I got this Simplecom SC314 5.25″ Bay Rack to 3.5″ SATA HDD Internal Enclosure for $16.95. Total cost is $146.90. I used a similar enclosure in my desktop gaming machine, so thought it would be suitable. If I needed in the future to expand my 3.5″ drives, then I could replace the Simplecom with another Silverstone 3-bay.

I had to wait nearly two weeks before the Silverstone FS303-12G was available for pickup as it had to be ordered in. Then part of a weekend was spent rebuilding my Data Recovery machine. The rebuild was completed and it was time to test it. On hindsight, maybe I shouldn’t have used the Simplecom SC314 as it doesn’t have any indicators on it to show that it’s is actively being accessed.

I should have used the Orico 1106SS-BK CD-ROM Space 3.5″ SATA HDD Mobile Rack that I had used in my gaming machine. It was just a little more expensive at $18 (down from $18.18 when I bought it last) as it would have been better to have the indicators. Maybe in the future, I might swap them over.

Here is the machine now – working away, copying a disk from the Simplecom to the middle slot of the 3-bay. The connections to the motherboard are as follows:

The 2.5″ FS202B has the top slot connected to Sata2 and the bottom slot to Sata1. Next, the Simplecom is connected to Sata3. Then Sata4, Sata5 & Sata6 in upwards order on the FS303. This makes it easy to remember, that the disk slots are in order from bottom to top.

Another Rebuild.IT article completed. Now that I think about it, I should have a raid rebuild article coming up – more on that later. I also found my notebook which contained details that I had written about in Restore.IT, Recover.IT – 2006 – When Murphy’s Law just wasn’t funny anymore! Or pages from the diary of a high-flying IT consultant and troubleshooter!

Repair.IT – Ikea Brusali wardrobe

I bought this wardrobe some years ago, and it had been used in my study room to store frequently used clothing, plus to put various boxes, cameras on top. It was originally placed next to the doorway. A few years later, it was moved to near the window as I had shifted my desk to be near the door.

Now, a few years – as my work progressed, I was having to walk back and forth to the sunroom where most of the work computers were set up. I create SOE images for Intel NUC’s used in the stores. I decided that it would be more efficient if I had the work area in my study, so there is less walking around and I can monitor the progress of builds more efficiently.

This meant that the Ikea Brusali wardrobe had to be moved. We moved it to the main bedroom where it can be a spare wardrobe. I noticed during the move that the back of the wardrobe had been separating.

You can see that the backing panel is held in place by flat headed nails, but over time and maybe moisture, the backing warps until the nails don’t hold it in place properly.

I decided that I could remove whatever nails were there, and I could use some small pieces of masonite. A few days ago, I cut some small squares of masonite material then drilled a 2mm hole in each. I then hammered the nails back in, through the masonite squares so that there is more surface area to hold the backing panels in place.

There were a few nails that were still holding in place – which I left alone. In hindsight, it may have been best to do this from the very beginning since those nails are not likely to hold the panels by themselves for a long time.

Anyway, another successful Repair.IT which isn’t related to electronics or computers or technology.