My journey of repairing and recycling anything I put my hands on that I believe is still useful. Not just hardware, but including software with relevant content and issues in the field of Cyber Security, Vulnerability Scanning and Penetration Testing.
We have an old Ikea office chair that was in need of a wash. The seat was removed and then the back was removed. The back had a bracket on it which clamps to the seat. To allow for proper washing of the fabric, I removed the bracket and took the cloth off the back so that it could be washed.
Later when I came to put the cloth back onto the frame, I noticed that the frame for the back should have four bolt holes, but one was blocked. I tried poking it out, expecting that it was some debris, but it turned out that the bolt had broken off in the hole while being removed.
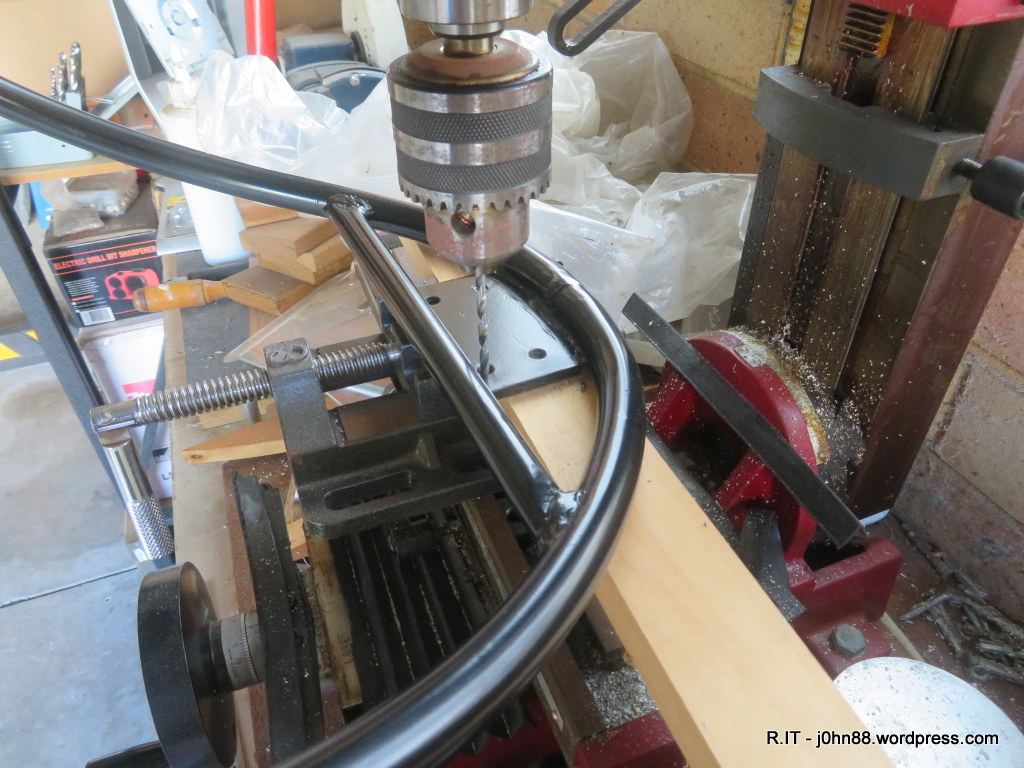
I tried using a screw remover in my hand drill, but it couldn’t get any purchase on the hardened bolt – so I had to think of something else. I could try drilling it out on my mill, but I would have to work out how to clamp the frame in the vice. I found a piece of wood that I drilled two holes into, then used other bolts to mount it on the frame.
I was able to clamp the wood in the vice. This allows me to get at the broken bolt – from the inside aspect so that if I try drilling it out with a 4mm drill bit, it may screw out of the hole, out the bottom. After a bit of force, it was drilling away then suddenly gave way, as the broken part of the bolt screwed out of the bottom of the hole. This technique works only if you have a through hole, not a blind hole.
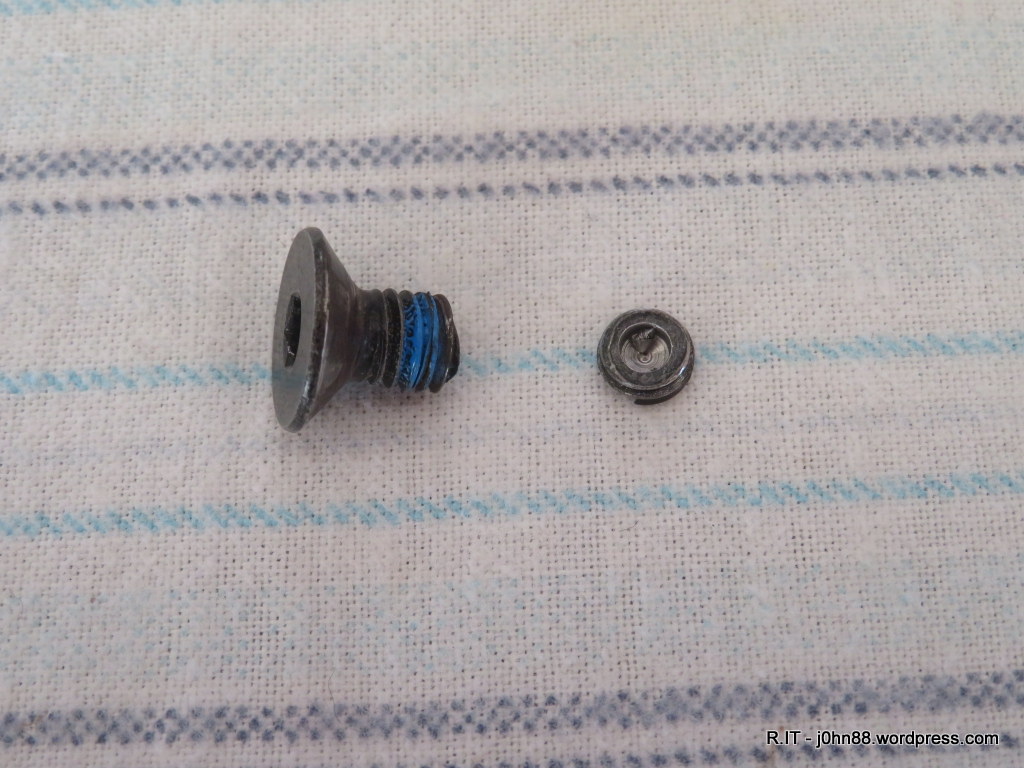
Here you can see where the drill was cutting into the piece of bolt, when it threaded out. It is shown next to the bolt that had broken off. Fortunately, there was still enough thread on the bolt to securely fasten the bracket back onto the frame for the back.
Now, you might ask – what if the drill just drilled straight through and I still have part of the bolt inside the hole? I still have a few choices. I could continue to drill progressively larger holes until I reach the minor diameter of the bolt. This will leave a sliver of metal in the shape of a spiral or a spring, which could then be picked at and unwound out of the hole.
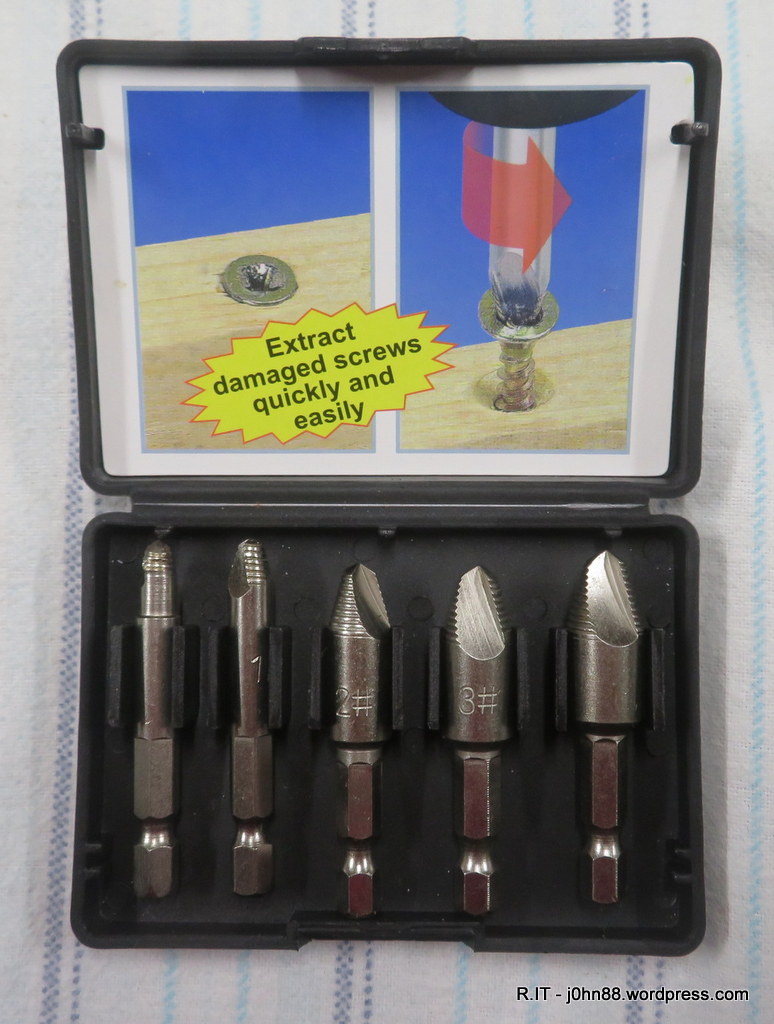
Another method would be to use either of these screw removers.
This one will go into a hand drill and used in counter-clockwise rotation. It is used if a screw or bolt is stuck in a hole, and is used from the outside of the hole. It will drill a tapered hole which eventually will jam and unscrew the broken bolt.
This type is one which will jam into an existing hole – like the one that I had been drilling. I would use the size that is smaller than the hole, in counter-clockwise direction, it will eventually jam in the hole and unscrew the bolt or screw.
Of course, definitely wear eye protection in the form of safety glasses – it isn’t unusual for the drill to suddenly break and a piece goes flying, or metal slivers coming off the bolt could be dangerous to your eyes. Anyway, another successful Remove.IT – of a broken bolt.
Oh, what if the bolt is broken in a blind hole? A similar technique can be used, is to get a left-hand drill bit to do the drilling, except that using this in a mill or drill press will not unscrew the broken bolt since the mill/drill is putting downwards pressure on it. Once the hole is drilled, then using the screw extractor in a hand-held drill in reverse will usually do the trick. If it doesn’t, then we have to continue to drill larger diameters with left-hand drill bits and then pick out the remaining sliver.
If that doesn’t work, then it is possible to just drill it out and use a helicoil or thread insert. This is used when the threaded hole is damaged – such as if it had been cross-threaded or damaged by using the wrong threaded bolt. We won’t get into that now. Thanks for reading.
Have I mentioned that I get a lot of jobs from family? These are not really jobs – you could say that these are chores or requests for assistance. Anyway, my brother mentioned that his daughter wanted to increase the storage on her laptop as it was getting full. I asked what laptop it was, and was told that it was a Lenovo Legion 5 15ACH6.
I asked him to get her to run “wmic diskdrive get model” from a command prompt on her laptop. It came back with SAMSUNG MZVLB512HBJQ-000L2 which told me that it was a M.2 512GB NVMe drive. This means that I could expand it to maybe 1TB, so ordered a Lexar 1TB NVMe disk which was available a few days later.
That was a couple of weeks ago, and today – being Anzac Day, he came over with his family and the laptop. He said that he would pick it up on a weekend.
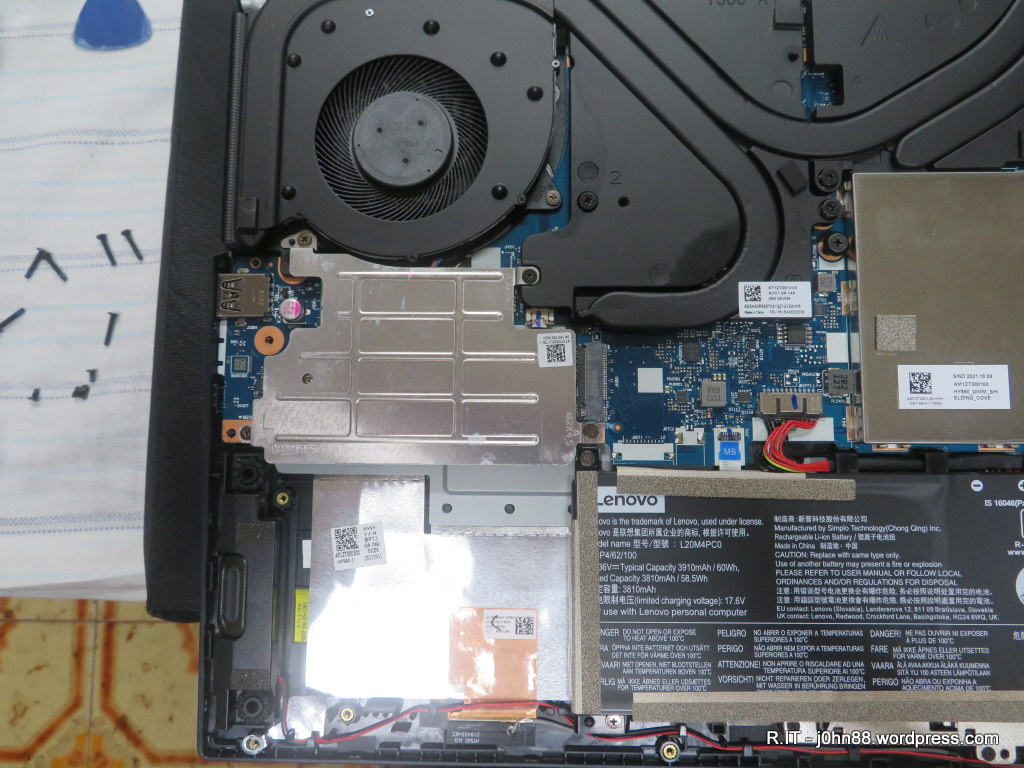
I removed 10 screws and was able to pry the bottom cover off. I could see where the original NVMe was located and to my surprise, found another NVMe socket on the other end of the motherboard.
I removed the metal shield and could see that the Lexar could fit in there – so that would be an easy job, just install it and then put the shield back on.
Well almost. I saw that one of the cpu fans was covered in dust, so had to vacuum and brush both of them to get rid of the dust. After that was done, I turned the laptop over and powered it on – leaving the bottom cover off, just in case it doesn’t work. I did put a spacer under it, so as not to block the fans.
Windows booted up, and I ran Disk Administrator, then was prompted to initialize the disk – and chose GPT, and then created a simple volume and did a quick format – all done. Ok – had to put the bottom cover on after shutting down, then put the screws in – 6 of which were long ones, wouldn’t want to mix those up, would we?
The addition of an extra 1TB of storage would Revitalize.IT – the laptop, I mean. I will let my niece sort out what data to move to the second disk, which should improve performance.
Wow, this is a record – for me to write about something that was only done today and not weeks, months or years ago.
In a previous article – Repurpose.IT – Norco SS-500 from data recovery machine to Truenas Scale storage server – I had swapped the motherboard in my data recovery machine so that the case with the Norco SS-500 could be repurposed to become a Truenas server. I also removed the Silverstone FS202B from that case, so will reuse it in my rebuilt Data Recovery machine.
The motherboard will stay the same – being the MSI B450-A PRO MAX together with its AMD Ryzen 5 3400G cpu and the 16GB of memory. I had another Coolermaster case on hand, so decided to use this together with a Corsair CS750M power supply. I didn’t need to use a 750W power supply, but I had this available. The Silverstone FS202B went into the case to be wired to the Sata1 & Sata2 ports.
This motherboard has a single M.2 slot that can handle NVMe or Sata SSD’s.
The important thing to note in this situation is that if I use an M.2 device, then I lose Sata5 & Sata6. I will have to remember this in future. The M.2 slot will handle both NVMe and Sata devices. I won’t need to use the M.2 slot for Sata devices, as I had bought a couple of M.2 to 2.5″ Sata adapters in 2021. This was the M.2 SSD NGFF (B Key) to 2.5″ SATA 7mm HDD Enclosure Case Converter Adapter and surprisingly, the price hasn’t changed from what I paid. I put my M.2 Sata SSD into one of these and just use one of the 2.5″ bays on the FS202B.
If I want to do copying of NVMe to NVMe, then I will have to use the onboard M.2 slot together with a Orico M.2 NVMe to PCIe 3.0 X16 Expansion Card that I bought for $16 late last year.
Two of the Sata ports are used, so now I need to get drive bays to fit four 3.5″ Sata disks. I could go for a SilverStone FS304-12G 4-Bay Triple 5.25″ Cage for 3.5″ SAS/SATA HDDs which is $179.95 from Mwave. The advantage of this cage is that it is trayless, so the disk drive just slides in and close the door – no more playing around with a screwdrive any time I want to swap a disk.
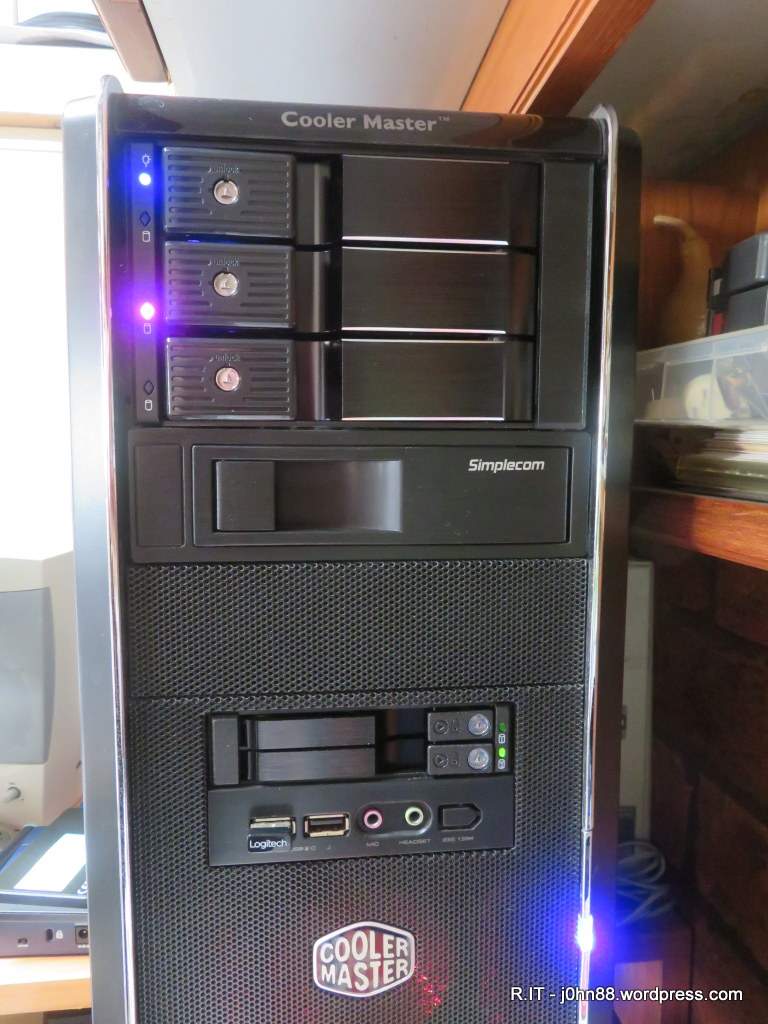
I had to wait nearly two weeks before the Silverstone FS303-12G was available for pickup as it had to be ordered in. Then part of a weekend was spent rebuilding my Data Recovery machine. The rebuild was completed and it was time to test it. On hindsight, maybe I shouldn’t have used the Simplecom SC314 as it doesn’t have any indicators on it to show that it’s is actively being accessed.
I should have used the Orico 1106SS-BK CD-ROM Space 3.5″ SATA HDD Mobile Rack that I had used in my gaming machine. It was just a little more expensive at $18 (down from $18.18 when I bought it last) as it would have been better to have the indicators. Maybe in the future, I might swap them over.
Here is the machine now – working away, copying a disk from the Simplecom to the middle slot of the 3-bay. The connections to the motherboard are as follows:
The 2.5″ FS202B has the top slot connected to Sata2 and the bottom slot to Sata1. Next, the Simplecom is connected to Sata3. Then Sata4, Sata5 & Sata6 in upwards order on the FS303. This makes it easy to remember, that the disk slots are in order from bottom to top.
I bought this wardrobe some years ago, and it had been used in my study room to store frequently used clothing, plus to put various boxes, cameras on top. It was originally placed next to the doorway. A few years later, it was moved to near the window as I had shifted my desk to be near the door.
Now, a few years – as my work progressed, I was having to walk back and forth to the sunroom where most of the work computers were set up. I create SOE images for Intel NUC’s used in the stores. I decided that it would be more efficient if I had the work area in my study, so there is less walking around and I can monitor the progress of builds more efficiently.
This meant that the Ikea Brusali wardrobe had to be moved. We moved it to the main bedroom where it can be a spare wardrobe. I noticed during the move that the back of the wardrobe had been separating.
You can see that the backing panel is held in place by flat headed nails, but over time and maybe moisture, the backing warps until the nails don’t hold it in place properly.
I decided that I could remove whatever nails were there, and I could use some small pieces of masonite. A few days ago, I cut some small squares of masonite material then drilled a 2mm hole in each. I then hammered the nails back in, through the masonite squares so that there is more surface area to hold the backing panels in place.
There were a few nails that were still holding in place – which I left alone. In hindsight, it may have been best to do this from the very beginning since those nails are not likely to hold the panels by themselves for a long time.
Anyway, another successful Repair.IT which isn’t related to electronics or computers or technology.
I also mentioned that the rack module didn’t have drive bay guide slots, so I had to bend the metal guides out of the way so that it could be fitted into the Coolermaster case. I didn’t mention that this module used trays that have four screws to fasten the disk drive in the tray. As time went on, and swapping out disks meant removing the screws and replacing the disk and inserting the screws that eventually I only used two screws. Another thing was that the fan at the back of this module was a bit loud.
A couple of weeks ago, I was reviewing my current network storage. I run a Qnap 4-bay NAS and also an older Seagate 4-bay NAS. Pricing of newer NAS storage boxes meant that I would have to spend more than $800 for anything larger than a 4-bay that had a x86 or x64 processor. I decided that I should build a Truenas Scale storage server that could then have at least five bays and had the capability of adding more drives as I needed.
I reviewed my various hardware parts that I had on hand, and decided on a MSI Z270 Krait Gaming motherboard that had a Pentium G4560 process and 16GB of ram. This motherboard combination had been used in one of my multi-GPU crypto-mining rigs and it was time to put it into use again. The reason for choosing this particular motherboard was that it could support 6 sata disks.
The motherboard also supports 2 M.2 slots that could use NVMe or Sata SSD’s.
From the manual, I looked up the M.2 & Sata combination table. The table suggests that if I put in a Sata SSD into M2_1, then Sata5 is unusable, and if I use a Sata SSD in M2_2 that Sata1 would be unusable. At the same time, using NVMe disks in both M2_1 & M2_2 would also disable Sata5 & Sata6. But my question is, if I put in a NVMe disk into only M2_1, does that mean I can still keep all Sata ports?
Analysis of the table, now seems to show that if I put a NVMe disk into M2_2, then both Sata5 & Sata6 is unusable. So I might be right that having a NVMe disk in M2_1 might be what I need to do. The reason is that Truenas Scale needs to be installed onto a disk of some sort, so might just be fine on the NVMe.
I decided to use the same case and power supply from the data recovery machine, so all I need to do is to remove the existing motherboard and install the MSI Z270 Krait Gaming in its place. This was done in due course, then with only one NVMe installed, no other Sata disks, I proceeded to install Truenas Scale.
I used Rufus to write the Truenas iso to a USB flash drive, but this wouldn’t boot for some reason. Then I tried again, but this time got Rufus to write the iso in dd format. This worked fine, and I now had a working Truenas, albeit without any storage.
The next thing to do was to install some disks. I had received two 8TB disks from Amazon, and I had three 4TB disks left over from upgrading my Qnap NAS after a couple of disk failures. The disks were configured as a mirror of the two 8TB’s and then a RaidZ1 with the 4TB’s.
This configuration used all five drive bays. To confirm my hypothesis that Sata6 is still usable, will be left for another day. All I needed to do was to move the server into the corner of the room where the noise is not as noticeable.
Ok, it wasn’t the only thing to do, I did decide to check the power usage over a period of time, and it varies from 61W to 65W. If I use 65W as the average power usage, then it will consume 1.56kWh per day. My electricity cost right now from Origin Electricity is 30.778c/kWh, so this Truenas storage server will cost me 48 cents a day to run, with a yearly cost of $175.37 in electricity. If I bought another Qnap NAS, costing over $800, it would use less power and hence, less electricity, so running costs might be reduced. Anyway, I think re-using current hardware would be cheaper in the long term.
Now what about my data recovery machine, which is missing a case and hot sway bays. There is another article on the way for that topic.
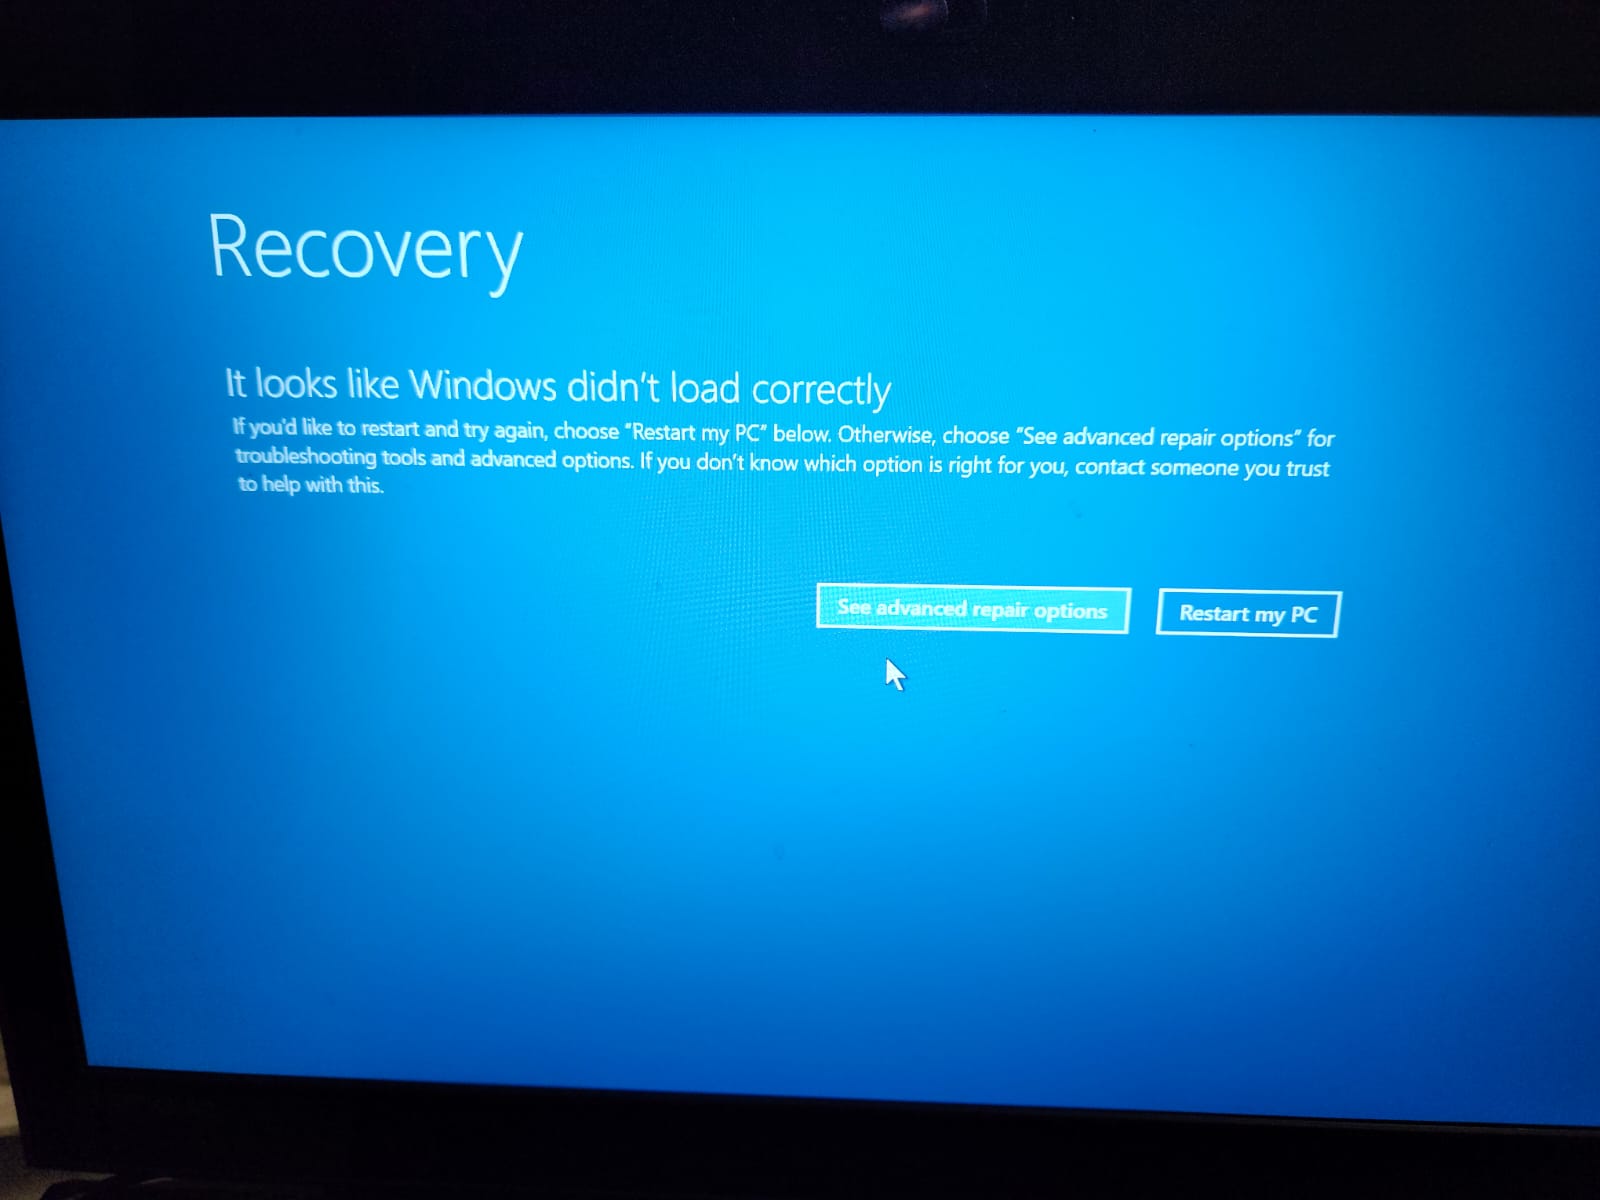
When my brother was coming over for Christmas, he mentioned that the laptop had been having intermittent problems, mostly not booting and ending up with this recovery screen.
I suggested that he bring it over and leave with me to look at. I had a quick look, and the laptop would intermittently reboot itself – so I thought that it may be due to the disk. In this case, the Samsung NVMe. After removing the numerous screws, the bottom cover of the laptop was removed and I could then take the NVMe out.
I installed the NVMe into my recovery machine, and added a new 2TB SSD. I intended to copy the NVMe to the SSD. I ran DD-Rescue and during the copy, it found 14 bad sectors. The NVMe can have bad sectors for numerous reasons including corrupted data, uncorrectable read errors and even bad checksums. I bought another NVMe – this time a Silicon Power 512GB NVMe. As my data recovery machine only had a single M.2 slot, I also bought an Orico M.2 NVMe to PCIe expansion card.
The new NVMe was installed into the expansion card, and I booted into Ubuntu and proceeded to copy the NVMe. This time the copy finished with 20 bad sectors. Hmm! Seems like things are getting worse – could be. Anyway, I put the Silicon Power NVMe back into the laptop and powered it up.
It booted fine, and I logged in and from an administrative command prompt – ran sfc /scannow in order to validate the system files. It completed after a short time and had to repair one file – ok, good. After doing this, I tested it by rebooting and shutting down, powering up, etc – and it didn’t have any problem. The only thing I found was that leaving the laptop without logging in seems to end up with a frozen black screen. This was likely that it was going to sleep but wasn’t waking up – or maybe it wasn’t properly in sleep mode as the Numlock light was on – I will look at this later on.
Since the Samsung NVMe had intermittent errors, I decided that I really should test it after running a secure erase. But before then – I decided to do a partition backup. This would allow me to check where the bad sectors were located.
I ran the command sudo fdisk -l /dev/nvme0n1
The first partition starts at sector 2048 – ok, and appears to be a 2048 sector gap between partition 3 and partition 4 – no matter. Let me copy the first 2048 sectors, which will contain the master boot record and other gpt partition data with sudo dd if=/dev/nvme0n1 of=mbr2048 bs=512 count=2048
No errors, then copy partition 1 sudo dd if=/dev/nvme0n1p1 of=nvme0n1p1.dd
No errors, continuing with partition 2 sudo dd if=/dev/nvme0n1p2 of=nvme0n1p2.dd
No errors again, now for partition 4 sudo dd if=/dev/nvme0n1p4 of=nvme0n1p4.dd
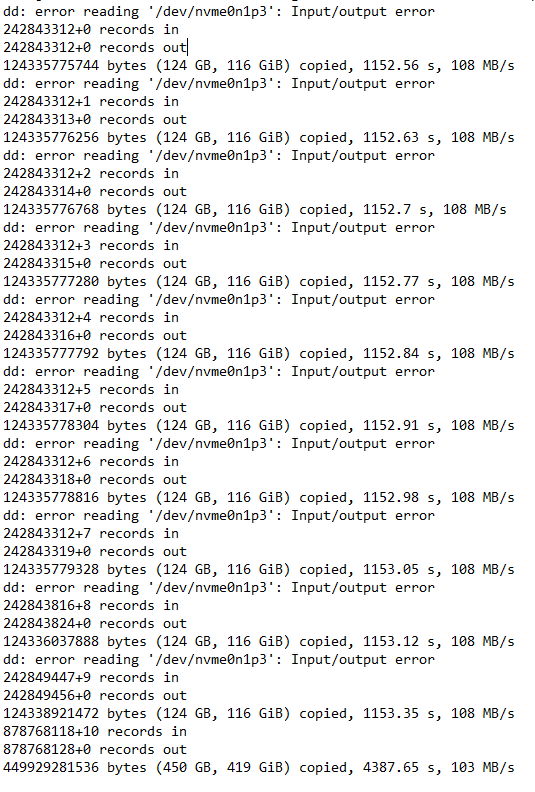
The Windows recovery partition copied without errors again – that’s good. Now for the main partition 3 sudo dd if=/dev/nvme0n1p3 of=nvme0n1p3.dd conv=noerror,sync with some extra parameters since I think it might contain bad sectors, so will ignore errors and replace bad sectors with blank sectors to maintain the sector continuity.
From the output, it appears that there were 10 errors. 8 bad sectors at 242843312, then 1 at 242843824 and another at 242849456. I thought I should try recopying those sectors and see if I can read them properly.
That worked ok, let me continue with sudo dd if=/dev/nvme0n1p3 of=242843824.dd bs=512 skip=242843824 count=1
Again fine, then the last one sudo dd if=/dev/nvme0n1p3 of=242849456.dd bs=512 skip=242849456 count=1
Again ok, so the sectors were intermittent and now I have all the data sectors. With this in hand, I proceeded to secure erase the Samsung NVMe. The process was a little involved since I had to boot back into Windows, install Samsung Magician software, then run it to create a USB bootable disk that would erase the NVMe. Once the USB was created – I powered down and removed all the disks except for the NVMe – would want to accidentally erase my Ubuntu or Windows disks, would I?
Power up and press F11 which is the boot menu key, chose to boot from USB and after accepting the prompts, the NVMe was erased after a short time. Power down, plug in my Ubuntu and data disk again, then power up, boot from Ubuntu. The process to write back to the NVMe was to first copy the mbr data with sudo dd if=mbr2048 of=/dev/nvme0n1
Then I would shutdown, then power up, so that Ubuntu would see that the NVMe has a partition structure, even if the partitions are missing. Then the following commands were run sequentially:
Since Ubuntu knew where the partitions should start from, those commands would restore the original 4 partitions, then the last three were to copy sectors that had been bad during the original copy. The seek= means to move the output pointer to that location before writing. Since I specified the block size (bs=512) to be a single sector, the count specifies how many sectors to write. I wanted to ensure that it didn’t overwrite anything except the missing sectors.
Once this was done, I plugged in my 2TB SSD and then performed a new copy from the NVMe to the SSD to test the integrity of the NVMe. The result was no errors – which was great. After shutting down, I took the Samsung NVMe and put it back into the laptop and tested again. After running the system file checker (sfc /scannow) which the same result, the laptop was booting up and running fine. I installed the Samsung Magician software and checked the NVMe SMART characteristics and it indicated that there were numerous times when the NVMe power was lost before a shutdown signal was seen. That was probably related to the times the laptop would go to sleep and not be able to be woken up.
Google indicated that there were a number of people who had this problem. I decided to disable hibernation on this laptop, by running the command powercfg /h off from an administrative command prompt. After this, I check to ensure that the sleep settings were set to Never, so should never go to sleep. This was done in Power Options.
Since then, it hasn’t gone to sleep even if I didn’t log on – ok, looks like problem might be solved and another successful Recover.IT.
All of this testing took place over a number of days since I wanted to be sure that the laptop wasn’t going to play up. My brother can now come and pick it up and to let me know if it starts happening again. If it does, then I should have a good case to return it for warranty replacement. If the laptop is shutdown in the middle of doing something, the writes to the NVMe might be interrupted and resulted in a half written sector or corrupted data. Fingers crossed that the problem is now resolved.
[Note 1: Before I forget – I had to do one more thing. This was to run sudo fdisk /dev/nvme0n1 and then put in a write command. This was to write the backup gpt partition data to the end of the disk where it expects it to be. My original copying only copied the main mbr and gpt partition data.]
[Note 2: The cpu fans were also very clogged up, so with the bottom cover removed, I also took the fan covers off then cleaned the fan blades by using tweezers to scrape the black dust and dirt from them and vacuuming. I didn’t take photos unfortunately, but I leave that to your imagination.]
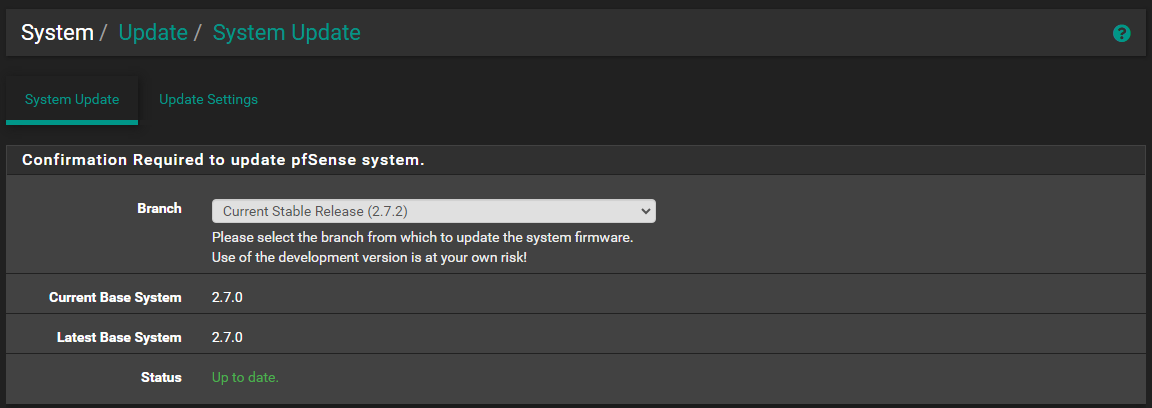
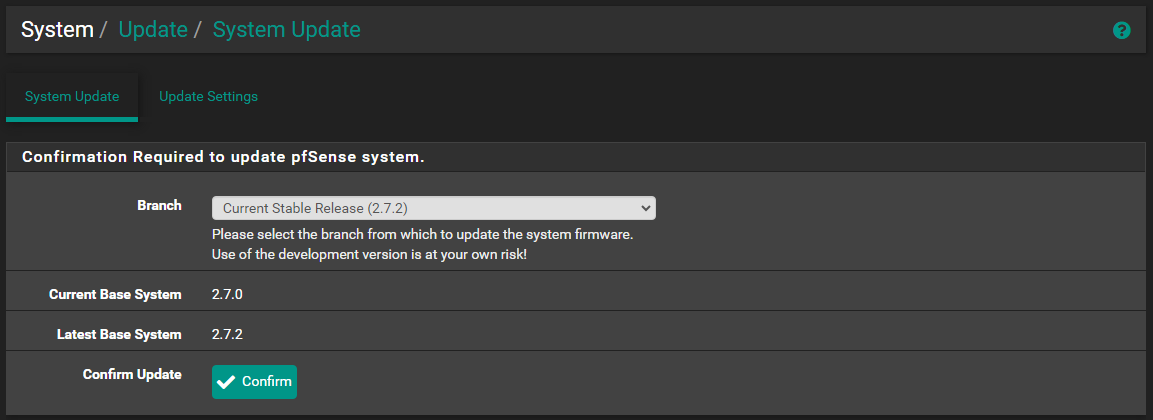
pfSense is supposed to be able to update on command, but obviously it wasn’t giving me any updates as it was supposed to even though the current Stable Release was showing up. I checked my backup firewall, and the same thing was happening on that one.
I run two firewalls in parallel so that I can update one of them, then swap over when I need to and then update the other one. After doing a bit of Google’ing, I found a reddit where someone mentioned that running a “certctl rehash” command fixed it for them. Netgate documentation shows that this may be needed if there are issues fetching packages.
As this is unlikely to break anything, I thought I would try this.
After running this command, I went back to check updates.
This command appears to have fixed update problem, and I can now see that 2.7.2 is showing for me to confirm the update.
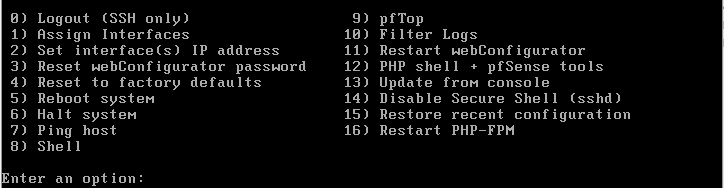
Now that the backup firewall is up to date, I can run it on the main firewall. Unfortunately, after the main firewall update ran, I saw an issue on the console that /etc/rc.initial wasn’t found. It should be showing a console menu like this:
The other thing I found was that the dashboard was still showing that it was on 2.7.0, but the update screen said it was currently on 2.7.2 – hence, it appears that the update somehow didn’t complete. Anyway, the backup firewall was still running, so I tried rebooting the main firewall – it came up but didn’t get a wan ip address, and also the lan interface wasn’t pinging – so something is definitely amiss with it.
No matter, I can just power it down and install a new virtual firewall with the current pfSenses 2.7.2 which I did the following morning. Once the appropriate settings were made – I was back in business with a new backup firewall. The broken firewall – I could either try further troubleshooting which might not be very productive, or just install 2.7.2 over the top.
I could also install another virtual firewall which is based on OPNsense. I have been testing OPNsense over the past year in my lab and appears stable. Anyway, that is all for now. Another Refresh.IT of pfSense.
My son drives my old Honda Civic, a 1998 model sedan which has been running reasonably well for a long time, albeit with occasional issues. He brought the car over late Thursday night, apparently had a flat tyre while at Silverwater, and didn’t swap over to the spare wheel. Then, the next morning, I went to have a look at it, and the tyre was completely flat, and the bead had separated from the rim.
I took out the space saver spare wheel and the car jack and proceeded to remove the flat tyre and swap over to the space saver. Then drove to Bob Jane T-Mart to get the flat repaired. It wasn’t repairable, so got a replacement Razer branded one for $89. I would have preferred Michelin XM2 or Yokohama ES32 but they didn’t have stock and would have to order it in. The Razer should be fine as it is the rear driver side and the Civic is front wheel drive.
Swapping the space saver out and putting the new tyre in, took just over 4 minutes, but then I realized that the wheel cover goes on before the wheel nuts, so had to take the nuts off and put them back on again. The car is getting old anyway, and needs replacing very soon. Anyway, he went shopping and came back and said that there was something wrong with the car.
It seems that the brake lights stay on, even when the car is turned off. He brought the car back over, and I had a quick look and couldn’t find the brake light switch. I did see some small pieces of plastic on the floor. After a bit of Google, I found someone who had a short video on fixing this problem. After viewing the video, I went back to the car and managed to see where the switch was. There is supposed to be a little plastic stopper pad that pushes against the switch when the brake is released. This pad has disintegrated, and was in five pieces which explained what I saw earlier. I managed to push one large end piece back into the hole and it turned off the brake lights, but it would need replacing.
The part I needed is a 46505-SA5-000 known as a brake or clutch pedal stop pad. I couldn’t find any local place that had this part, and could only find it at online stores. I could find a picture of it, and thought that I should be able to make it out of nylon or something similar. I had the bits left over, and found that it was about 16-17mm in diameter and 4 mm thick for the pad, but there is a piece that jams into the hole in the brake pedal – which seemed to be just over 8 mm. After having the Civic brought back over, I measured the hole in the pedal and got about 8.1 mm. Also the piece that I had jammed into the hole had already broken into two – must have been brittle with age.
After rummaging around in my tool boxes, I found a large piece of 16 mm thick nylon or maybe polyethylene. I cut a square piece off and proceeded to turn it in the lathe, into a round cylinder of about 17mm diameter, then about 4mm from one end, turned it down to 8.25 mm overall, but then turned a small section close to the pad, down to 8.1mm. Presumably, it should press into the hole in the brake pedal which would then lock it in place.
I must have measured the hole a bit on the low side as the pad now is a slight loose fit, but it won’t come off and should be fine for a few years at least. In the above photo, the pad I made is the white piece that is pushing against the switch. When the brake pedal is pushed, the pad moves away from the switch that then turns the brake lights on. Whent he brake pedal is released, the pad will push the plunger back into the switch, thereby turning off the brake lights. Without this pad, the switch plunger doesn’t get pushed in and stays out, hence the brake lights stay on.
I have this old Ozito 18V Cordless Line Trimmer. It had worked well in the past, but it had been retired due to the failure of the 18V NiCad battery pack. Nickel Cadmium batteries have a memory effect and will often fail prematurely – usually due to not being used as often or not being kept charged. For whatever reason, one or two of the NiCad cells would fail, then the line trimmer would run slowly.
I had previously added a DC power socket to the handle and could use a laptop power pack to run in conjunction with the failing battery, but it then made it a corded line trimmer. In the end, it was simpler to dispose of the battery pack and get an Ozito electric corded line trimmer, that has been working well for the past few years.
My house sits on a corner block, and going from the garage to the furthest point requires me to use three long outdoor extension leads. I usually have two leads coiled in a bucket – which I drag out as I go, but to do the final edge trimming – I need to take another extension lead and join it on the end. It was such a hassle that I did this only half to a third of the time, with the result being that this particular section looks scruffier than the rest.
Now you know the background. Two years ago, I noticed that there is an adapter socket that takes the AEG 18V Lithium batteries that I use from my cordless drill. It was about $15 and I thought it would be good to try out and rejuvenate my Ozito cordless line trimmer.
During the Covid pandemic, we had a routine that any parcels arriving from overseas, or delivered – would be placed in quarantine. Essentially, this was an area of the house that arriving parcels would be opened to check the contents – then left for a while, so that any potential viruses attached to the parcel would have time to die. Of course, after touching the parcels, we had to sanitise. We did this even for grocery items – placing them in a separate pantry – yes, I know – it was overkill.
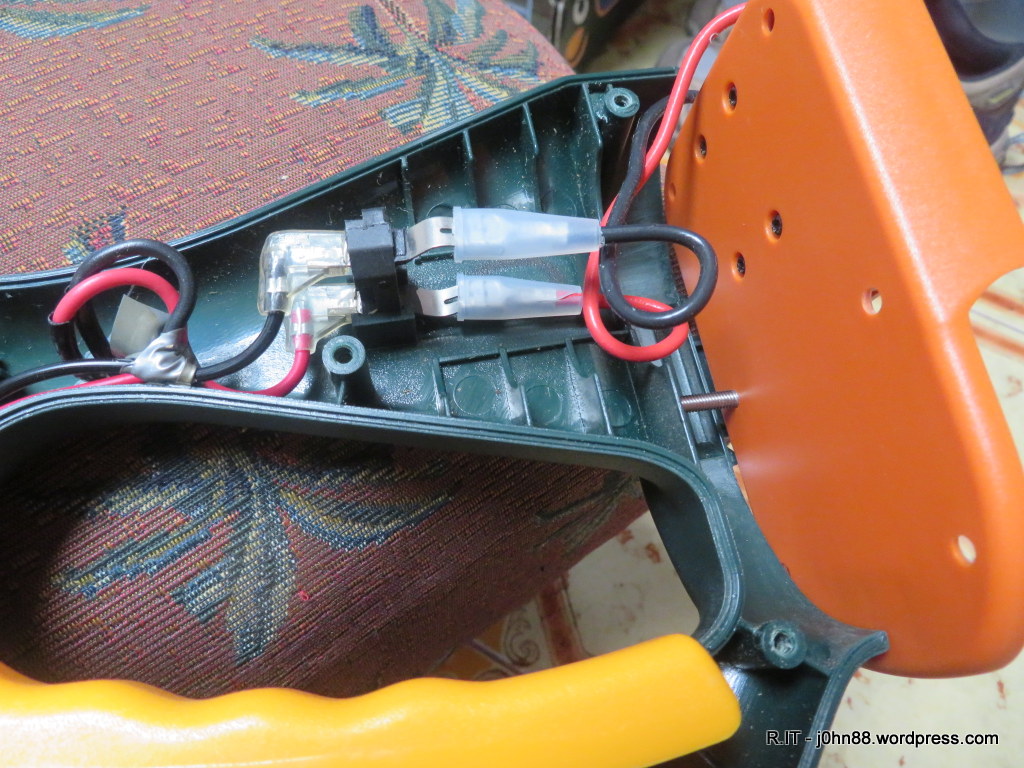
Anyway, while fixing the AEG battery – I remembered that I hadn’t finished that battery adapter project, so I went to Jaycar yesterday to get some male automotive spade terminals. I remembered that I needed male spade terminal which were 6.4mm or 1/4″. I bought those in red, but when I got home and disassembled the line trimmer handle, I found that the size I needed was actually 4.8mm. It just goes to show that the carpenter’s rule – measure twice, cut once – also applies to other things. Measure or validate twice, buy once. I will be able to use those terminals elsewhere. Not only that – the battery adapter had very thick wiring – the red terminals can only handle 0.75mm wiring, so I needed at least blue terminals to handle the wiring. Two things wrong.
A check for 4.8mm male spade terminals in blue, couldn’t find solid ones, only those that were expected to be screwed down such as onto a terminal block. I had some older spade terminals, so decided to connect them onto the battery side. I wanted originally to remove that black piece that connected to the old battery pack, but now I will use it this way for now.
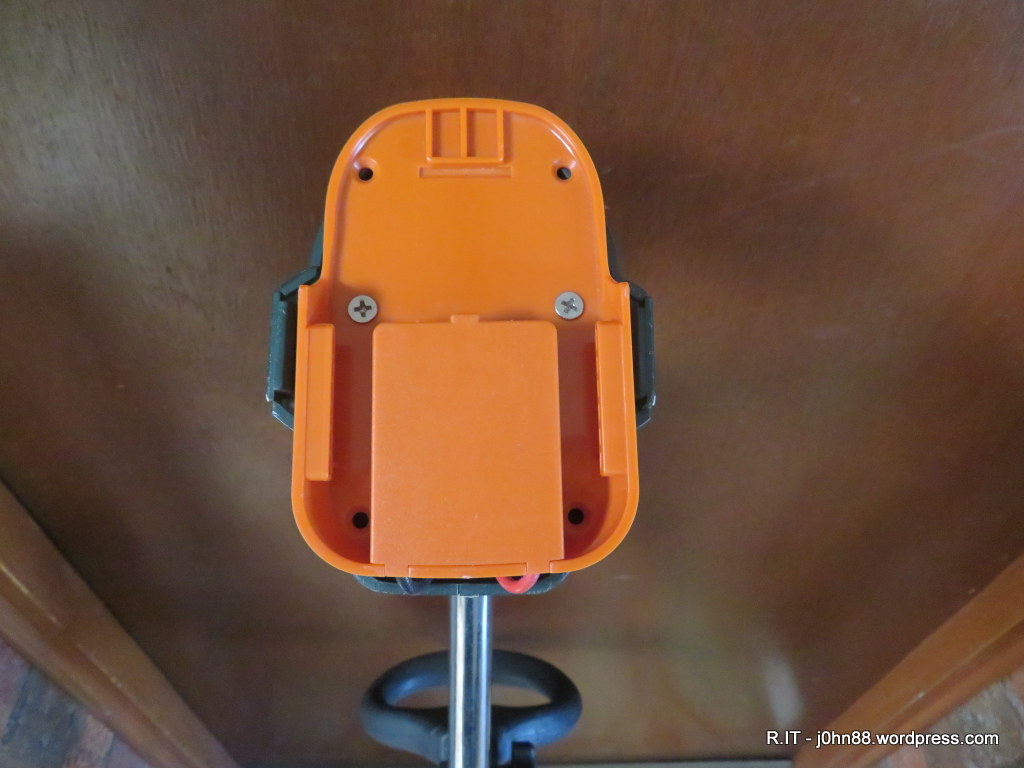
Then it was a matter of putting the handle cover back on, then attaching another bolt to hold the battery adapter in place – like this.
I had drilled 3.5mm holes through to the plastic of the handle casing. Then using a M4 stainless steel countersunk bolt of 30mm in length, screwed into the plastic. I did this slowly so that the M4 bolt forces a thread into the hole. If I have any problems with this in the future, I would add an wooden insert to make it a bit more solid.
Now the completed product. The other 5.5mm DC socket, was from an earlier attempt to add external power. The AEG battery pack is 2.5Ah and allowed me to cut some of the grass that was growing up around the fence on the granny flat, and trim the grass next to the brick walls.
Another successful Rejuvenate.IT – getting my old Ozito cordless line trimmer back into operation. I must admit that having used this for a day or two, it does seem to be a bit underpowered. Of course it won’t be as powerful as the corded one, but this one wasn’t breaking the line at all – even when it hits some really tough grass. It might actually be the battery pack that is limiting the current. The battery pack of course is for a drill, so the electronics may perform current limiting.
The other Ozito corded line trimmer would often suddenly spin faster, so I knew that one of the lines had broken off. Then it was a matter of removing the spool, and rethreading the line out again. During a trimming session, I might have to do that several times – and it is a bit frustrating when that happens. With this cordless one, I may never use the corded one again.
Maybe I should try getting one of those Ridgid equivalent battery packs, that are 4Ah or 6Ah. It would help by lasting longer, and maybe
It happened that a week ago, I went to use my AEG drill and found that the battery wouldn’t work. I had a look, and it wasn’t the battery that I had fixed that time. The AEG brushless drill set that I bought at the time, came with two 18V batteries. This time, it was the second battery that had the issue.
The same sort of thing, remove the screws to get access to the individual lithium cells in the battery pack. I checked the voltages and found that two of them were lower than the others.
It was a matter of getting my Swallow charger out again, then charging each individual cell again. Even the ones that appeared to be fine would be topped up. This will allow all the cells to be in a similar state of charge when I use the battery pack again.
My Swallow charger was set to charge at 2.5A and 3.6V for the Lithium-Ion terminal voltage. The charger will stop automatically once the cell reaches 4.1V and charge current has dropped to almost zero.
While the cells were being charged, I looked up on eBay and found that the Ridgid 4AH battery packs were now around $43.99, so these have gone up $7 in the past two years – much like everything else has been going up.
Here is a photo of my charging setup, currently charging the second last cell. The Swallow is powered by a home-made power supply that provides 13.5V in series with an ammeter so that I can see how much current is being drawn. I built this power supply back in the mid-70’s to power my amateur radio transceiver – which at the time, was a modified Midland CB radio. Incidentally, the box containing the ammeter also has a relay in it, so if the power supply were to turn off, it would automatically connect a 12V battery (not currently plugged into the back terminals).
I had previously noticed that the plastic on one of the banana plugs was going pale and cracking with age, and have bought replacements. I will eventually make up two leads with thicker wires.
I have another project that I will be using this AEG 18V battery pack for. I just need to get a couple of parts before I can do that and let you know what that project is.